Creating Web Server Based on SQL
Overview
Create web server based on sql provides a complete web backend service solution from development to deployment. The core feature of this solution is: developers only need to connect to the database, and standard CRUD API interfaces can be automatically generated, without writing any Go language code, achieving "low-code development" for web services. However, when custom APIs need to be added, traditional development methods must be used, manually writing all related API code (including defining request/response data structures, registering routes, writing controllers, business logic code, etc.).
Tips
Another web development solution Create web server based on protobuf (see Based on Protobuf) compensates for this deficiency. It supports automatically generating custom API code; only business logic code needs to be manually written or generated by an AI assistant, providing developers with a more efficient custom API development experience.
Applicable Scenarios: Suitable for web projects where the majority of APIs are standard CRUD APIs.
Prerequisites
Sponge supports database types mysql, mongodb, postgresql, sqlite. The following operations use mysql as an example to describe the steps for web service development. The development steps for other database types are the same.
Environment Requirements:
- sponge installed
- mysql database service
- database table structure
Tips
Generating code requires the mysql service and database tables. You can start the mysql service using the docker script and then import the example SQL.
Creating Web Server
Operation Steps
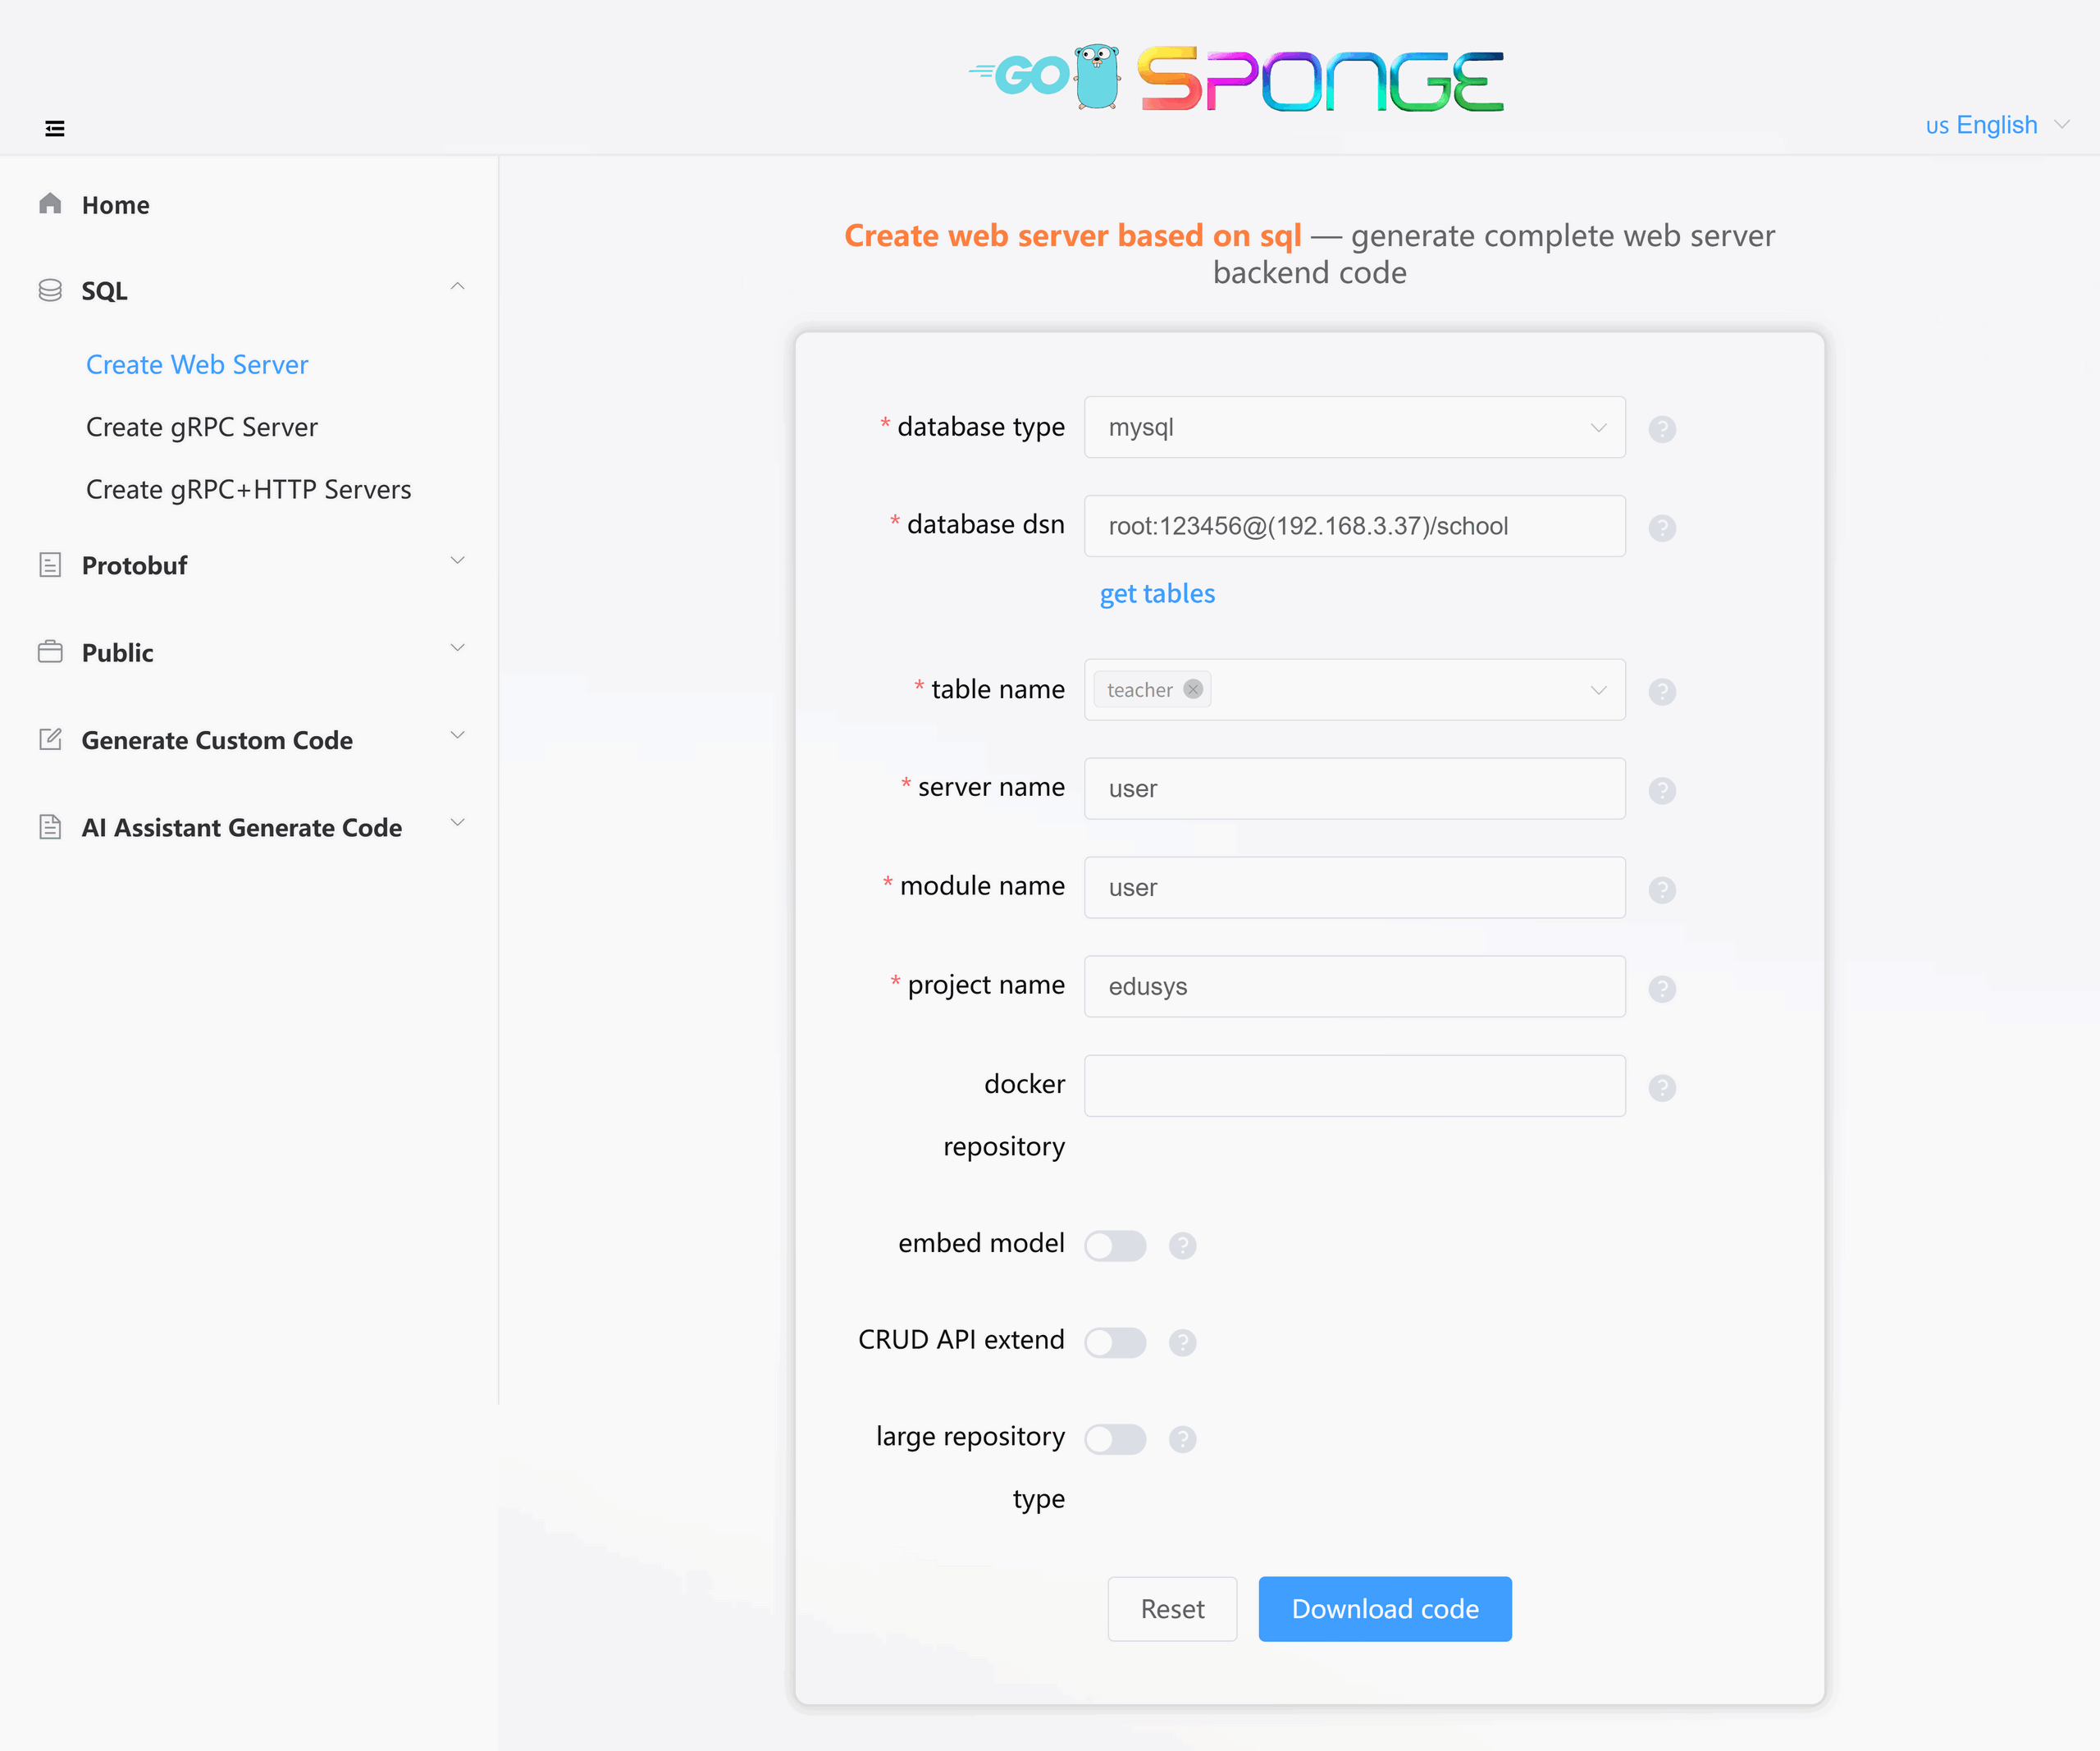
Execute the command sponge run in the terminal to enter the code generation UI:
- Click on the left menu bar [SQL] → [Create Web Server];
- Select database
mysql, fill indatabase dsn, then click the buttonGet table names, and select table names (multiple can be selected); - Fill in other parameters. Hover the mouse over the question mark
?icon to view parameter descriptions;
Tips
If the large repository type option is enabled when filling in parameters, this setting must be maintained for all subsequent related code generation.
After filling in the parameters, click the button Download code to generate the complete web service project code, as shown in the figure below:

Equivalent Command
sponge web http --module-name=user --server-name=user --project-name=edusys --db-driver=mysql --db-dsn="root:123456@(192.168.3.37:3306)/school" --db-table=teacherTips
The generated Web service code directory is named in the format
service_name-type-timestampby default. You can modify this directory name as needed.The system automatically saves records of successfully generated code. When you generate code again, if the
Database DSNremains unchanged, the available table name list will be loaded automatically after refreshing or reopening the page, without needing to manually click theGet table namesbutton to select table names.
Directory Structure
The generated code directory structure is as follows:
.
├─ cmd                          # Application entry directory
│   └─ user                     # Service name (user service)
│       ├─ initial              # Initialization logic (e.g., config loading, service setup, etc.)
│       └─ main.go              # Main entry file of the program
├─ configs                      # Configuration files directory (YAML config templates)
├─ deployments                  # Deployment-related files
│   ├─ binary                   # Binary deployment scripts/configs
│   ├─ docker-compose           # Docker Compose orchestration files
│   └─ kubernetes               # Kubernetes deployment manifests
├─ docs                         # Project documentation (API docs, design docs, etc.)
├─ internal                     # Internal implementation code (not exposed externally)
│   ├─ cache                    # Cache implementations (Redis or local in-memory cache wrappers)
│   ├─ config                   # Config parsing and struct definitions
│   ├─ dao                      # Data Access Object (DAO) layer
│   ├─ ecode                    # Error code definitions
│   ├─ handler                  # Business logic layer (similar to Controller)
│   ├─ model                    # Data models/entity definitions
│   ├─ routers                  # Route definitions and middleware
│   ├─ server                   # Service startup and lifecycle management
│   └─ types                    # Request/response struct definitions
├─ scripts                      # Utility scripts (e.g., code generation, build, run, deploy, etc.)
├─ go.mod                       # Go module definition file (declares dependencies)
├─ go.sum                       # Go module checksum file (auto-generated)
├─ Makefile                     # Project build automation script
└─ README.md                    # Project description document
The Web service code generated by sponge adopts a layered architecture. The complete call chain is as follows:
cmd/user/main.go → internal/server/http.go → internal/routers/router.go → internal/handler → internal/dao → internal/model
The handler layer is mainly responsible for API processing. If more complex business logic needs to be handled, it is recommended to add an additional business logic layer (such as service, logic or biz) between the handler and dao. For details, please click to view the Code Layered Architecture chapter.
Testing the Web Service API
Unzip the code file, open the terminal, switch to the web service code directory, and execute the commands:
# Generate swagger documentation
make docs

# Compile and run the service
make run
Open http://localhost:8080/swagger/index.html in your browser to test CRUD APIs on the page, as shown in the figure below:

Swagger Configuration Description
If you modify the HTTP port in the configs/service_name.yml configuration file (for example, changing from 8080 to 9090), you must complete the following operations synchronously:
- Modify the
@hostvalue in the code filecmd/service_name/main.goto the new port (e.g., localhost:9090). - Re-execute
make docsto generate the documentation.
Otherwise, API requests will fail due to inconsistent ports.
Adding CRUD APIs
If new mysql tables need to generate CRUD API code, the CRUD APIs generated by sponge can be seamlessly added to the web service code without writing any Go code.
Generating Handler CRUD Code
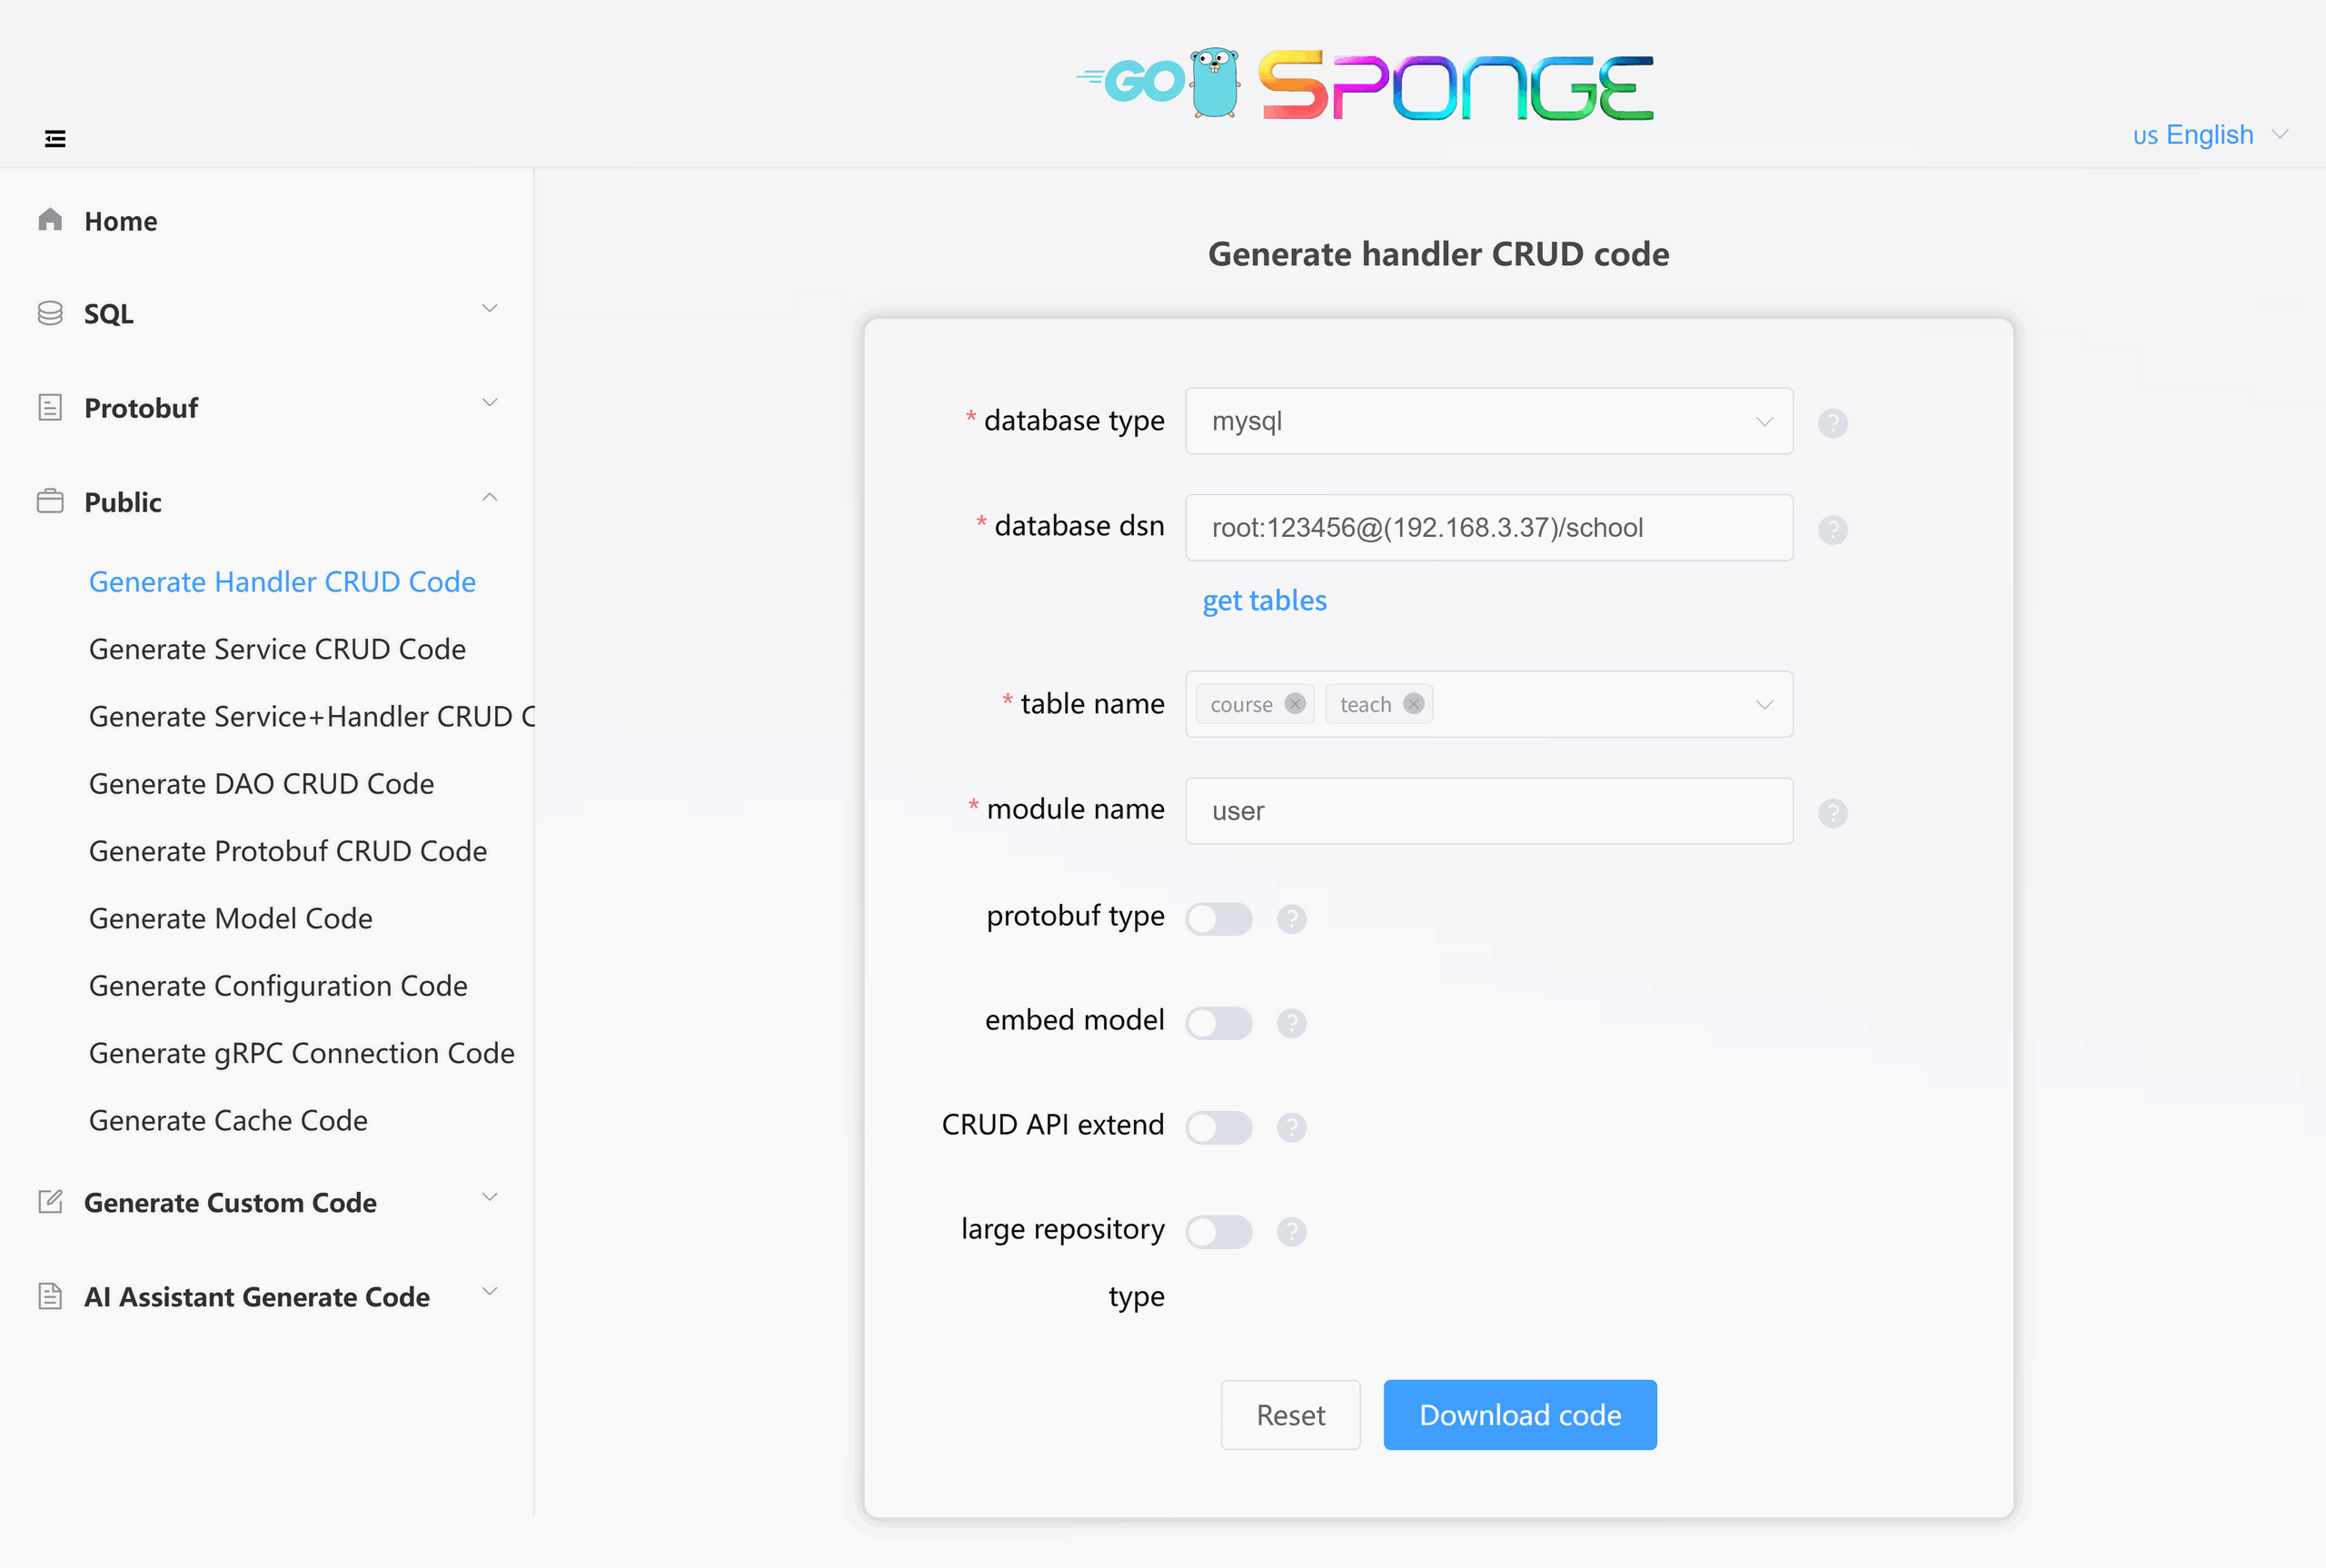
- Click on the left menu bar [Public] → [Generate Handler CRUD Code];
- Select database
mysql, fill indatabase dsn, then click the buttonGet table names, and select mysql tables (multiple can be selected); - Fill in other parameters.
After filling in the parameters, click the button Download code to generate the handler CRUD code, as shown in the figure below:

Equivalent Command
# Full command
sponge web handler --module-name=user --db-driver=mysql --db-dsn="root:123456@(192.168.3.37:3306)/school" --db-table=course,teach

# Simplified command (use --out to specify the service code directory, generated code is automatically merged into the specified service directory)
sponge web handler --db-driver=mysql --db-dsn="root:123456@(192.168.3.37:3306)/school" --db-table=course,teach --out=user
Code Directory Structure
The directory structure for the generated handler CRUD code is as follows:
.
└─ internal
    ├─ cache
    ├─ dao
    ├─ ecode
    ├─ handler
    ├─ model
    ├─ routers
    └─ types
Testing CRUD APIs
Unzip the generated code package, move the entire internal directory to the root directory of the web service code, and execute the following commands:
# Generate swagger documentation
make docs

# Compile and run the service
make run
Refresh the Swagger page http://localhost:8080/swagger/index.html in your browser to view and test the newly added CRUD APIs.
Tips
The List interface in CRUD APIs supports powerful custom condition pagination query functionality. Click to view detailed usage rules: Custom Condition Pagination Query.
Developing Custom APIs
The Create web server based on sql solution currently does not support automatic generation of custom API template code. Developers can follow the steps below for development:
- Define request/response data structures and set field validation rules.
- Define Handler functions and add Swagger annotations.
- Define business error codes (optional).
- Register API routes.
- Implement business logic.
- Test and verify.
1. Defining Data Structures
Enter the directory internal/types, open the file teacher_types.go, and add the code for the login request and response structs:
// LoginRequest login request params
type LoginRequest struct {
    Email      string `json:"email" binding:"email"`      // email
    Password   string `json:"password" binding:"min=6"`   // password
}

// LoginReply login reply result
type LoginReply []struct {
    ID       uint64 `json:"id"`
    Token    string `json:"token"`
}
Note
The binding tag in the struct field tags is for field validation rules. Click to view more validator validation rules.
2. Defining Handler Functions
Enter the directory internal/handler, open the file teacher.go, define a login method, and add swagger annotations:
// Login login
// @Summary login
// @Description login by account and password
// @Tags teacher
// @accept json
// @Produce json
// @Param data body types.CreateLoginRequest true "login information"
// @Success 200 {object} types.Result{}
// @Router /api/v1/teacher/login [post]
func (h *teacherHandler) Login(c *gin.Context) {
    // Parse request parameters
    // Verify password
    // Generate and store token

    response.Success(c, gin.H{
        "id": 1,
        "token": "xxxxxx",
    })
}
Then add the Login method to the TeacherHandler interface:
type TeacherHandler interface {
    Create(c *gin.Context)
    // ...
    Login(c *gin.Context)
}
3. Defining Error Codes (Optional)
Enter the directory internal/ecode, open the file teacher_http.go, add a line of code to define the login error code:
var (
    // ...
    ErrLoginTeacher        = errcode.NewError(teacherBaseCode+8, "failed to login "+teacherName)
    // for each error code added, add +1 to the previous error code
)
4. Registering Routes
Open the file internal/routers/teacher.go and register the Login route:
func teacherRouter(group *gin.RouterGroup, h handler.TeacherHandler) {
    // ...

    group.POST("/teacher/login", h.Login)
}
5. Implementing Business Logic
There are two ways to implement business logic code:
Manually write business logic code
Open the code file
internal/handler/user.goand write the business logic code for login, such as verifying the password, generating tokens, etc.Note
In developing custom APIs, you may need to perform database CRUD operations or cache operations. You can reuse the following code:
Automatically generate business logic code
Sponge provides a built-in AI assistant to generate business logic code. Click to view the section on AI Assistant generates code.
The business logic code generated by the AI assistant may not fully meet actual requirements and needs to be modified according to the specific situation.
6. Testing Custom APIs
After implementing the business logic code, execute the following commands in the terminal:
# Generate swagger documentation
make docs

# Compile and run the service
make run
Refresh the Swagger interface http://localhost:8080/swagger/index.html in your browser and then test the custom API.
As you can see, adding custom APIs is much more cumbersome than adding standardized CRUD APIs (auto-generated), because all related code for custom APIs needs to be written manually. Therefore, the Create web server based on sql approach is more suitable for web projects where most APIs are standard CRUD. When a project requires the development of a large number of custom APIs, creating Web services based on Protobuf is a better choice compared to traditional methods. However, developers need to be familiar with the rules for using Protobuf.
Service Configuration Description
The Create web server based on sql solution provides a rich set of configurable components. You can flexibly manage these components by modifying the configs/service_name.yml configuration file.
Component Management Description
Custom gin middleware:
- You can add or replace middleware in
internal/routers/routers.go. - If API authentication is required, add
middleware.Auth()ininternal/routers/table_name.go.
Default Enabled Components
| Component | Function Description | Configuration Documentation |
|---|---|---|
| logger | Logging component • Default terminal output • Supports console/json formats • Supports log file splitting and retention | Logger Configuration |
| enableMetrics | Prometheus metrics collection • Default route /metrics | Monitoring Configuration |
| enableStat | Resource monitoring • Records CPU/memory usage per minute • Automatically saves profile when threshold exceeded | Resource Statistics |
| database | Database support • MySQL/MongoDB/PostgreSQL/SQLite | Gorm Configuration MongoDB Configuration |
Default Disabled Components
| Component | Function Description | Configuration Documentation |
|---|---|---|
| cacheType | Cache support (Redis/Memory) | Redis Configuration |
| enableHTTPProfile | Performance analysis (pprof) • Default route /debug/pprof/ | - |
| enableLimit | Adaptive request limiting | Rate Limiting Configuration |
| enableCircuitBreaker | Service circuit breaker protection | Circuit Breaker Configuration |
| enableTrace | Distributed tracing | Tracing Configuration |
| registryDiscoveryType | Service registration and discovery • Consul/Etcd/Nacos | Service Registration and Discovery Configuration |
Configuration Update Process
If you add or change field names in the configuration file configs/service_name.yml, you need to update the corresponding Go code (internal/config/xxx.go). Execute the following command in the terminal:
# Regenerate configuration code
make update-config
Note
If you only modify the field values in the configuration file, you do not need to execute the make update-config command, just recompile and run.
Tips
To learn more about the detailed information of components and configurations, click to view the Components and Configurations chapter.