Performance Testing Tool perftest
Overview
perftest is a lightweight, high-performance, open-source stress testing tool that supports two modes: standalone performance testing and distributed cluster performance testing. It can meet the needs of small-scale validation during the development phase as well as simulate real high-concurrency scenarios in a production environment.
Features
- ✅ Standalone Performance Testing: Quickly verify API functionality and perform initial performance assessments.
- ✅ Distributed Cluster Performance Testing: Break through single-machine bottlenecks and simulate real-world high concurrency.
- ✅ Multi-Protocol Support: Supports HTTP/1.1, HTTP/2, HTTP/3, WebSocket.
- ✅ Real-time Monitoring: During the test, data such as QPS, latency distribution, data transfer, and status code statistics are pushed in real-time to a custom HTTP endpoint or a Prometheus monitoring system.
- ✅ WebSocket Message Performance Testing: Supports custom message content and sending intervals to simulate message push scenarios in business contexts.
Installation
go install github.com/go-dev-frame/sponge/cmd/sponge@latestAfter installation, run sponge perftest -h to view the help information.
Standalone Performance Testing
perftest supports standalone performance testing, which involves initiating a large number of requests from a single machine. It is typically used for verifying API functionality and conducting initial performance assessments.
Why Use Standalone Performance Testing?
Verify API Functionality
- Check if the API functions correctly and if the responses are as expected.
- Identify obvious bugs, such as parameter handling errors, response timeouts, or abnormal status codes.
Establish a Preliminary Performance Baseline
- Determine the approximate QPS (Queries Per Second) the system can handle.
- Assess response latency (p50, p95, p99).
- Identify any clear bottlenecks (e.g., slow database, lock contention, insufficient memory).
Optimize During Development
- Perform quick regression tests in a local development environment.
- Problems are easier to reproduce when testing on a single machine.
Standalone performance testing is more about "API debugging + small-scale performance testing." It helps you discover significant performance weaknesses in your system.
1. HTTP/1.1 Standalone Test Example
# Default parameters: 3*CPU workers, 5000 requests, GET method
sponge perftest http --url=http://localhost:8080/user/1

# Fixed number of requests: 3*CPU workers, 500k requests, POST method, with JSON body
sponge perftest http --total=500000 --method=POST \
  --url=http://localhost:8080/user \
  --body="{\"name\":\"Alice\",\"age\":25}"

# Fixed duration: 50 workers, 10s duration, GET method
sponge perftest http --worker=50 --duration=10s --url=http://localhost:8080/user/1

# Fixed number of requests: 3*CPU workers, 500k requests, GET method, push statistics to a custom HTTP endpoint every second
sponge perftest http --total=500000 \
  --url=http://localhost:8080/user/1 \
  --push-url=http://localhost:9090/report

# Fixed duration: 3*CPU workers, 10s duration, GET method, push statistics to Prometheus (job=xxx) every second
sponge perftest http --duration=10s \
  --url=http://localhost:8080/user/1 \
  --push-url=http://localhost:9091 \
  --prometheus-job-name=perftest-http
Sample Test Report:
========== HTTP/1.1 Performance Test Report ==========

[Requests]
  • Total Requests:    1000000
  • Successful:        1000000 (100%)
  • Failed:            0
  • Total Duration:    7.14 s
  • Throughput (QPS):  139981.2 req/sec

[Latency]
  • Average:           0.34 ms
  • Minimum:           0 ms
  • Maximum:           24.99 ms
  • P25:               0 ms
  • P50:               0 ms
  • P95:               1.04 ms
  • P99:               2.1 ms

[Data Transfer]
  • Sent:              25000000 Bytes
  • Received:          49000000 Bytes

[Status Codes]
  • 200:               1000000
2. HTTP/2 Standalone Test Example
Usage is the same as HTTP/1.1, just replace http with http2:
# Fixed number of requests: 3*CPU workers, 500k requests, GET method
sponge perftest http2 --total=500000 --url=https://localhost:6443/user/1

# Fixed duration: 3*CPU workers, 10s duration, GET method
sponge perftest http2 --duration=10s --url=https://localhost:6443/user/1
3. HTTP/3 Standalone Test Example
Usage is the same as HTTP/1.1, just replace http with http3:
# Fixed number of requests: 3*CPU workers, 500k requests, GET method
sponge perftest http3 --total=500000 --url=https://localhost:8443/user/1

# Fixed duration: 3*CPU workers, 10s duration, GET method
sponge perftest http3 --duration=10s --url=https://localhost:8443/user/1
4. WebSocket Standalone Test Example
# Default mode: 10 workers, 10s duration, random messages (100 characters)
sponge perftest websocket --worker=10 --duration=10s --url=ws://localhost:8080/ws

# Send fixed string message, 10ms interval per worker
sponge perftest websocket --worker=100 --duration=1m \
  --send-interval=10ms \
  --body-string=abcdefghijklmnopqrstuvwxyz \
  --url=ws://localhost:8080/ws

# Send JSON message, each worker sends messages continuously
sponge perftest websocket --worker=10 --duration=10s \
  --body='{"name":"Alice","age":25}' \
  --url=ws://localhost:8080/ws

# Send JSON message, 10ms interval per worker
sponge perftest websocket --worker=100 --duration=1m \
  --send-interval=10ms \
  --body='{"name":"Alice","age":25}' \
  --url=ws://localhost:8080/ws```

**Sample Test Report:**
Example of Test Report:
========== WebSocket Performance Test Report ==========

[Connections]
• Total:              10
• Successful:         10 (100%)
• Failed:             0
• Latency:            min: 14.80 ms, avg: 14.80 ms, max: 14.80 ms

[Messages Sent]
• Total Messages:     2954089
• Total Bytes:        295408900
• Throughput (QPS):   590817.80 msgs/sec

[Messages Received]
• Total Messages:     2954089
• Total Bytes:        295408900
• Throughput (QPS):   590817.80 msgs/sec
Distributed Cluster Performance Testing
When the capacity of a single machine is insufficient, perftest can help you build a testing cluster to generate massive loads and identify performance issues across the entire link.
Why is Distributed Testing Necessary?
Single-machine load testing cannot replicate the complexity and scale of modern production environments. Adopting a distributed solution is crucial because it can:
Break Through Single-Machine Bottlenecks
- Distribute the load across multiple agent machines, with each machine generating only a fraction of the total traffic.
- Aggregate the performance of all machines to simulate millions or even tens of millions of concurrent requests.
Simulate Realistic User Behavior
- Simulate users from different geographical regions and network environments (e.g., latency, packet loss).
- Requests initiated from multiple nodes can more accurately replicate real-world usage scenarios.
Uncover Large-Scale System Issues
- Verify if load balancers are distributing traffic correctly.
- Detect hotspot issues in distributed caches or database clusters.
- Troubleshoot network bottlenecks, such as bandwidth exhaustion or NAT table overflows.
Validate Elasticity and Scalability
- Test the auto-scaling capabilities of cloud-native services.
- Simulate peak business traffic to verify if your infrastructure can scale horizontally as expected.
Core Architecture
The perftest cluster consists of two core components:
- Collector (Master): The central control node responsible for creating test sessions, coordinating agent nodes, and aggregating performance test results in real-time.
- Agent: The worker node responsible for executing the actual test tasks and pushing performance metrics to the Collector.
The architecture diagram is as follows:
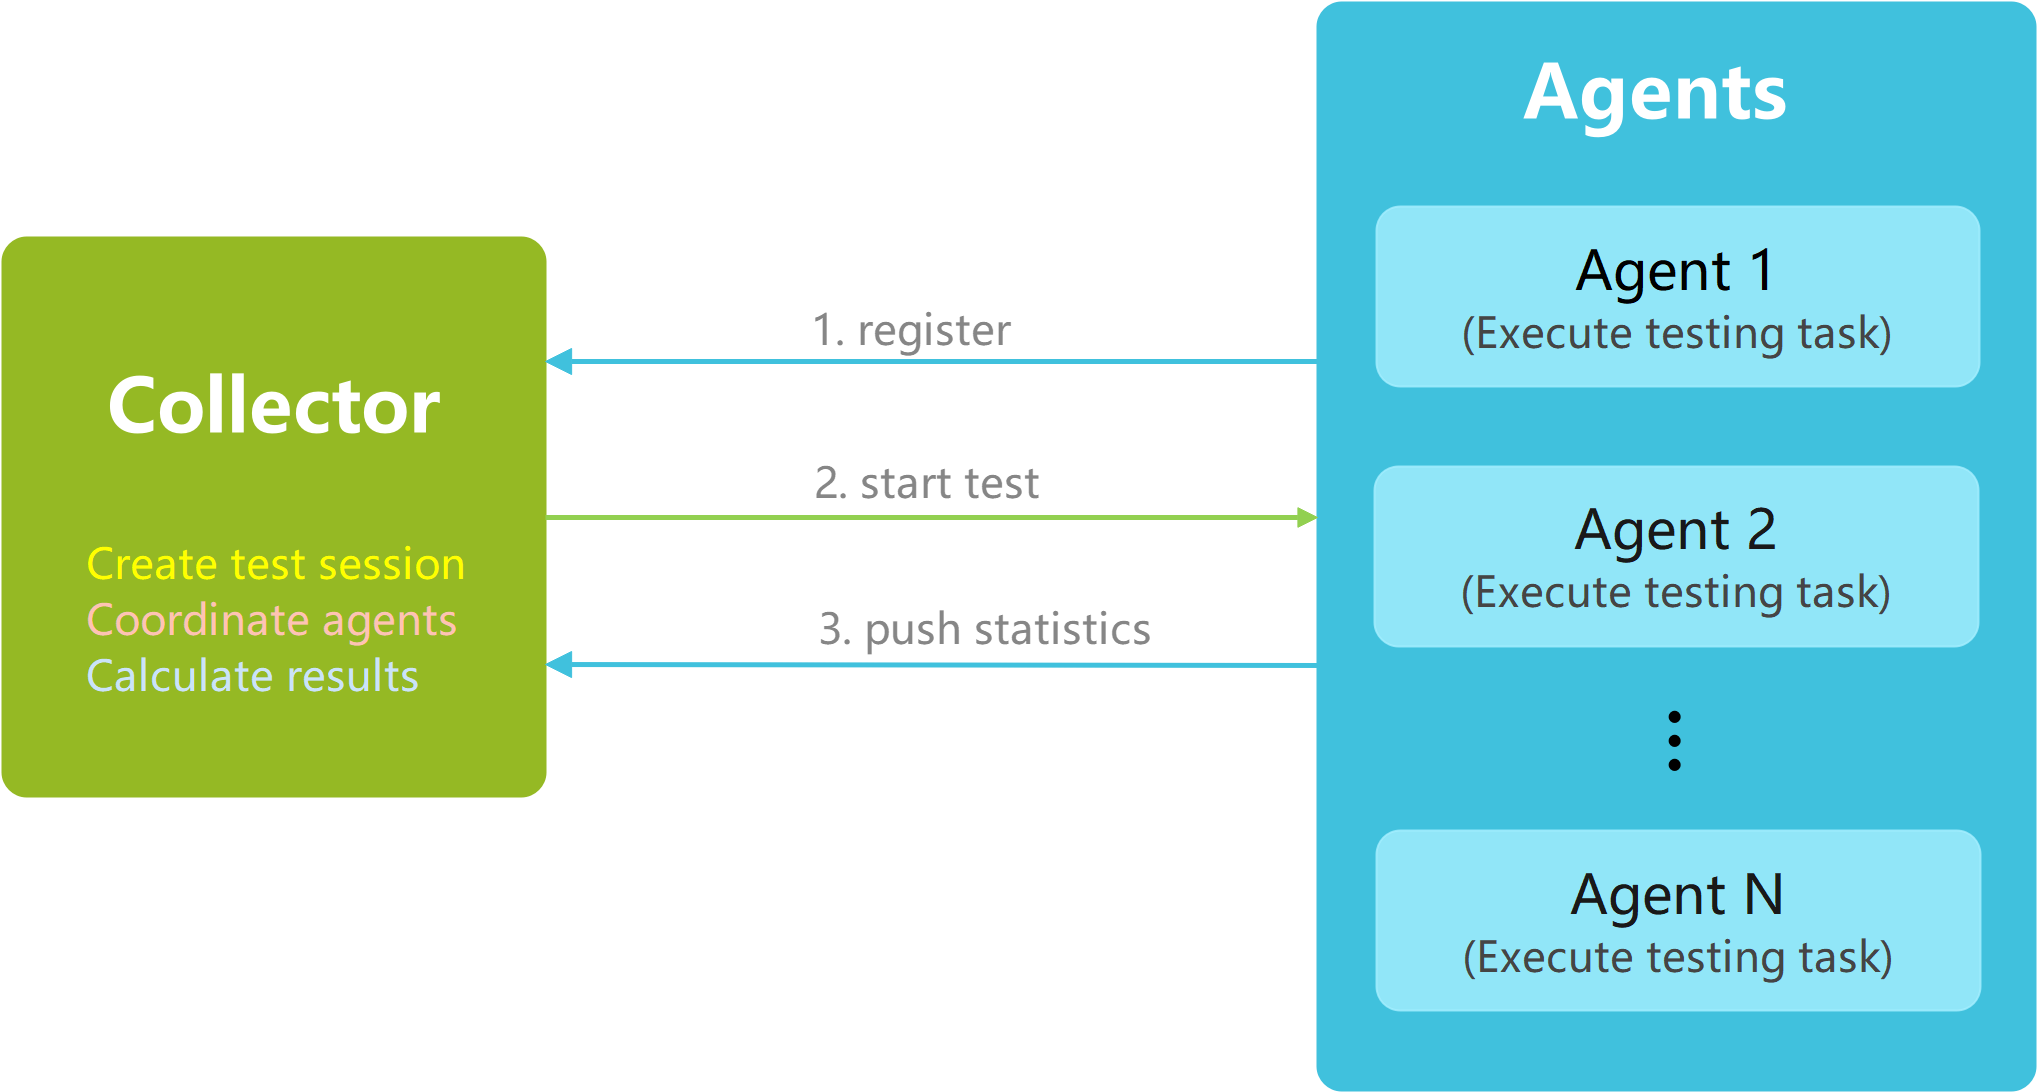
This simple Master-Agent architecture makes it incredibly easy to scale testing capabilities—just add more agent nodes.
Testing Workflow
- Start the Collector: The Collector service starts and provides a web management interface.
- Create a Test Session: In the web interface, specify the desired number of agent nodes to participate in the test, then start a new session.
- Start the Agents: After each agent starts, it reads its configuration file and automatically registers with the Collector.
- Begin the Test: Once the preset number of agents has completed registration, the Collector instructs all agents to start the test simultaneously.
- Aggregate Results: Agents push performance data (throughput, latency, etc.) to the Collector in real-time, which is displayed on the dashboard.
Tip: The agent actively listens to its
agent.ymlconfiguration file. Any changes are automatically hot-reloaded without restarting the agent process, making it very convenient to adjust test parameters.
Quick Start: A Simple Cluster Example
Let's set up a small cluster consisting of one Collector and three Agents.
- Machine 1 (Collector):
192.168.1.20 - Machine 2 (Agent 1):
192.168.1.101 - Machine 3 (Agent 2):
192.168.1.102 - Machine 4 (Agent 3):
192.168.1.103
Step 1: Run the Collector
On Machine 1 (192.168.1.20), start the Collector service:
sponge perftest collectorYou will see the following output:
2025/09/20 17:33:49 collector server starting on port 8888
[Tip]: access 'http://localhost:8888' in the browser to enter the testing interface

2025/09/20 17:33:49 waiting for create a new test session...
Now, open your browser and navigate to http://192.168.1.20:8888. In the UI, enter the number of agents (3) and click "Start Test" to create a new test session. The Collector will now wait for three agents to connect.
Step 2: Configure and Run the Agents
On each agent machine, create an agent.yml configuration file.
agent.yml Example:
# 1. Protocol Configuration (supported: http | http2 | http3)
protocol: http

# 2. Target API Configuration
testURL: "http://localhost:8080/get"
method: "GET"        # Supported methods: GET | POST | PUT | PATCH | DELETE
body: ""             # Supported data types: JSON, Form-data, Text. Example: "{\"key\": \"value\"}"
headers:
  - "Authorization: Bearer <token>"
  #- "Content-Type: application/json"

# 3. Test Strategy (choose one: fixed duration or fixed number of requests)
duration: 10s             # e.g., 10s, 1m, 2h
# total: 500000           # Total number of requests

# 4. Service Discovery, ensure the collector and agent services can communicate
collectorHost: "http://192.168.1.20:8888"     # Address of the Collector service
agentHost: "http://<agent-host-ip>:6601"      # The IP and port where the current agent is accessible
agentPushInterval: 1s                         # Metrics push frequency
Important:
- Replace
<agent-host-ip>inagentHostwith the actual IP address of each agent machine (e.g.,192.168.1.101,192.168.1.102,192.168.1.103). - For the same test session, the
testURLandmethodin all agent configuration files must be identical.
Now, start the agent process on Machines 2, 3, and 4, respectively:
sponge perftest agent --config=agent.ymlThe agents will automatically register with the Collector upon startup. To ensure successful registration, the testURL and method in each agent's agent.yml file must match those of the first agent that successfully registered. If registration fails, check if the Collector has created a test session and ensure all agent configurations are consistent.
Once all 3 agents have successfully registered, the Collector will automatically coordinate them to start the test synchronously. The charts on the test interface will display key metrics like throughput, latency, data transfer, status code distribution, and error messages in real-time.
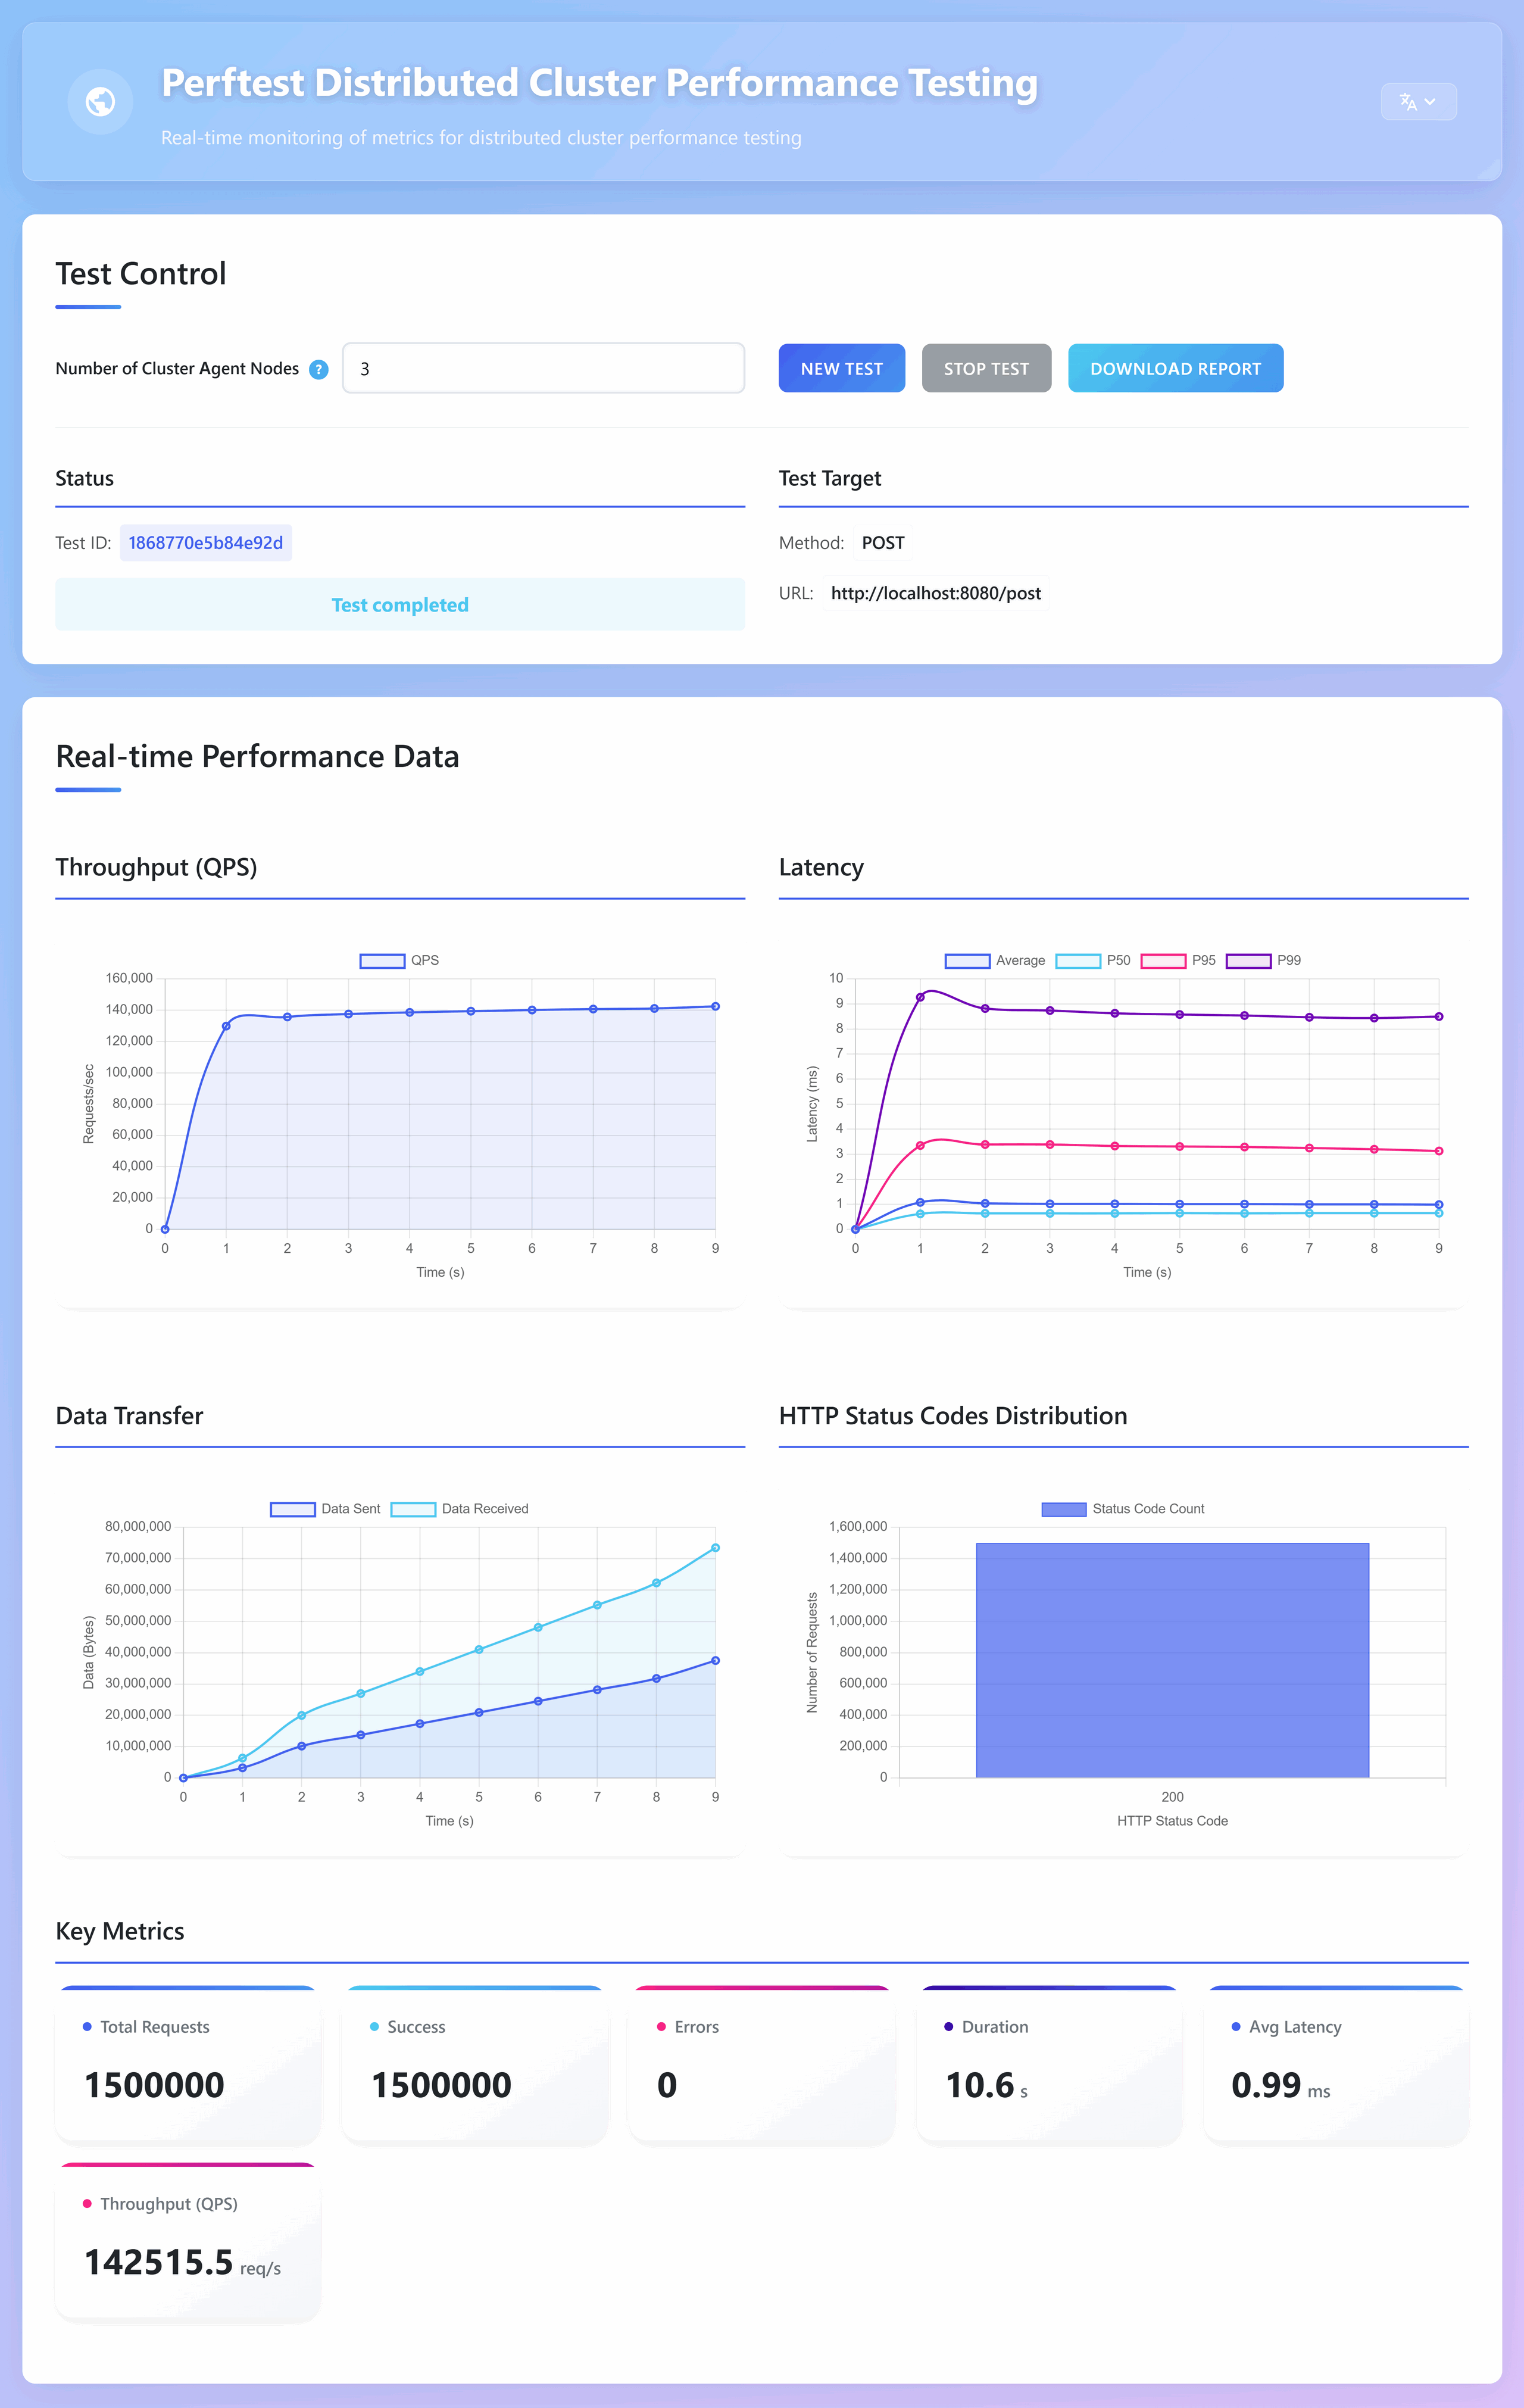
After the test is complete, click the Download Test Report button to save the statistical report (in Markdown format) locally for later analysis.
If you need to change the test target (e.g., testURL, method), simply update the agent.yml file. The agents will automatically reload the new configuration without needing a restart.
Deploying perftest on Kubernetes
For large-scale testing, managing nodes manually is impractical. perftest can be easily deployed on Kubernetes, allowing you to scale your number of agents effortlessly.
We provide a complete deployment manifest file:
Click to view perftest-deployment.yml
# -----------------------------------------------------------------------------
# -- Namespace: Used to isolate all resources related to performance testing
# -----------------------------------------------------------------------------
apiVersion: v1
kind: Namespace
metadata:
  name: perftest

---

# -----------------------------------------------------------------------------
# -- Collector Deployment: Manages the deployment of Collector Pods
# -- Key Points:
# -- 1. replicas: 1, ensures that there is only one collector instance in the cluster.
# -- 2. command/args: Defines the container's startup command and arguments, listening on port 8888.
# -- 3. podAntiAffinity: Defines an anti-affinity rule to "prefer" not scheduling it on the same node as any Pod with the "app: agent" label,
# --    to avoid resource contention between the critical collector node and resource-intensive agent nodes.
# -----------------------------------------------------------------------------
apiVersion: apps/v1
kind: Deployment
metadata:
  name: collector
  namespace: perftest
  labels:
    app: collector
spec:
  replicas: 1
  selector:
    matchLabels:
      app: collector
  template:
    metadata:
      labels:
        app: collector
    spec:
      containers:
        - name: collector
          image: zhufuyi/perftest:latest
          imagePullPolicy: IfNotPresent
          # Defines the container startup command and arguments
          command: ["collector"]
          args: ["-a", "http://$(NODE_IP):30088"]                     # Method 1: Option -a specifies the collector's listening address as Node IP:30088
          #args: ["-a", "http://<LoadBalancer-Fixed-IP>:8888"] # Method 2: Option -a fills in the fixed IP that the LoadBalancer will assign or a domain name that resolves to that IP
          #args: ["-a", "http://perftest.yourcompany.com"]        # Method 3: Option -a fills in the entry point of the Ingress Controller
          ports:
            - containerPort: 8888
              name: http
          # Use Downward API to inject Node IP
          env:
            - name: NODE_IP
              valueFrom:
                fieldRef:
                  # fieldPath: status.hostIP references the IP address of the node where the Pod is located
                  fieldPath: status.hostIP
#      # Force the Pod to be scheduled only on nodes with the label role=collector-node. First, ensure a node is labeled with the command: kubectl label nodes <node-name> role=collector-node
#      nodeSelector:
#        role: collector-node
#      # Use Pod anti-affinity rule:
#      affinity:
#        podAntiAffinity:
#          # "preferredDuringSchedulingIgnoredDuringExecution" indicates this is a "soft" limit.
#          # If the scheduler cannot find a suitable node, it will still schedule the Pod, but it will prefer nodes without agent Pods.
#          preferredDuringSchedulingIgnoredDuringExecution:
#            - weight: 100 # Weight value, range 1-100. The higher the value, the higher the priority.
#              podAffinityTerm:
#                labelSelector:
#                  matchExpressions:
#                    - key: app
#                      operator: In
#                      values:
#                        - agent
#                topologyKey: "kubernetes.io/hostname" # "topologyKey" defines the scope of isolation, here it is by "node" (hostname).

---

# -----------------------------------------------------------------------------
# -- Collector Internal Service (ClusterIP): Exposes the Collector service internally within the cluster
# -- Purpose:
# -- Provides a stable and unique DNS entry (collector-service.perftest.svc.cluster.local) for all agent Pods,
# -- for service discovery and registration. Even if the Collector Pod restarts or moves and its IP changes, the Service address remains the same.
# -----------------------------------------------------------------------------
apiVersion: v1
kind: Service
metadata:
  name: collector-service
  namespace: perftest
spec:
  type: ClusterIP # Default type, only accessible within the cluster
  selector:
    app: collector # Forwards traffic to Pods with the label "app: collector"
  ports:
    - protocol: TCP
      port: 8888       # The port the Service listens on
      targetPort: 8888 # The target port on the Pod to which traffic is forwarded

---

# -----------------------------------------------------------------------------
# -- Collector External Service (NodePort): Exposes the Collector's Web UI externally to the cluster
# -- Purpose:
# -- Allows users to access the Collector's UI by visiting the IP address of any cluster node plus a specific port number.
# -----------------------------------------------------------------------------
apiVersion: v1
kind: Service
metadata:
  name: collector-external-service
  namespace: perftest
spec:
  type: NodePort         # Exposes the service on a static port on each node's IP
  #type: LoadBalancer   # Use a cloud provider's load balancer to expose the service to the public internet
  selector:
    app: collector
  ports:
    - protocol: TCP
      port: 8888           # The port the Service listens on within the cluster
      targetPort: 8888  # The target port on the Pod to which traffic is forwarded
      nodePort: 30088  # If not specified, Kubernetes will automatically assign a port from the range 30000-32767

---

# -----------------------------------------------------------------------------
# -- Agent ConfigMap: Stores the configuration file (agent.yml) for the agent nodes
# -- Key Points:
# -- 1. collectorHost: Points to the collector's internal ClusterIP Service, ensuring agents can reliably find the collector.
# -- 2. agentHost: Is dynamically replaced with the Pod's actual IP address when the agent container starts.
# -----------------------------------------------------------------------------
apiVersion: v1
kind: ConfigMap
metadata:
  name: agent-config
  namespace: perftest
data:
  agent.yml: |
    # 1. Test protocol configuration, supports: http | http2 | http3
    protocol: http

    # 2. Test target API configuration
    testURL: "http://localhost:8080/get"
    method: "GET" # Supports GET | POST | PUT | PATCH | DELETE
    body: ""          # Supported data types: JSON | Form-data | Text. JSON example: {\"key1\": \"value1\", \"key2\": \"value2\"}
    headers:
      - "Authorization: Bearer <token>"
      #- "Content-Type: application/json"

    # 3. Test strategy configuration, supports both duration and fixed number of requests strategies, choose one
    duration: 10s         # test duration (e.g., 10s, 1m)
    #total: 500000       # total requests to send

    # 4. Collector and agent service address configuration, ensure collector and agent services can access each other
    collectorHost: "http://collector-service.perftest.svc.cluster.local:8888"
    #agentHost: ""  # Dynamically replaced by the Pod IP injected via Downward API, http://<POD_IP>:6601
    agentPushInterval: 1s

---

# -----------------------------------------------------------------------------
# -- Agent Deployment: Manages the deployment of Agent Pods
# -- Key Points:
# -- 1. replicas: Number of deployed agent instances.
# -- 2. podAntiAffinity: Defines anti affinity rules that prioritize the decentralized scheduling of agent Pods to different physical nodes and avoid resource contention.
# -- 3. Downward API: Injects each Pod's own IP address (`status.podIP`) into
# --    an environment variable named `POD_IP`.
# -- 4. ConfigMap: Mounts the agent.yml configuration file to `/etc/config/agent.yml` in each agent Pod.
# --    The agent watches for changes to agent.yml and reloads automatically without requiring a Pod restart.
# -----------------------------------------------------------------------------
apiVersion: apps/v1
kind: Deployment
metadata:
  name: agent
  namespace: perftest
  labels:
    app: agent
spec:
  replicas: 100
  selector:
    matchLabels:
      app: agent
  template:
    metadata:
      labels:
        app: agent
    spec:
      containers:
        - name: agent
          image: zhufuyi/perftest:latest
          imagePullPolicy: IfNotPresent
          command: ["agent"]
          args:
            - "--config=/etc/config/agent.yml" # When the configuration file changes, the agent will automatically reload
            - "--agent-ip=$(POD_IP)"
            - "--agent-id=$(POD_NAME)"
          # Use Downward API to inject the Pod IP as an environment variable
          env:
            - name: POD_IP
              valueFrom:
                fieldRef:
                  fieldPath: status.podIP
            - name: POD_NAME
              valueFrom:
                fieldRef:
                  fieldPath: metadata.name
          volumeMounts:
            # Mount a key from the ConfigMap directly as a file
            - name: config-volume
              mountPath: /etc/config/agent.yml # The mount point is a file, not a directory
              subPath: agent.yml              # Specify which key from the ConfigMap to mount
      volumes:
        # Define the ConfigMap volume
        - name: config-volume
          configMap:
            name: agent-config
      affinity:
        podAntiAffinity:
          # "preferredDuringSchedulingIgnoredDuringExecution" indicates this is a "soft" limit.
          # The scheduler will try its best to spread the agent Pods across different nodes. If a suitable node cannot be found, it will allow multiple agent Pods to be scheduled on the same node.
          preferredDuringSchedulingIgnoredDuringExecution:
            - weight: 100
              podAffinityTerm:
                labelSelector:
                  matchExpressions:
                    - key: app
                      operator: In
                      values:
                        - agent
                topologyKey: "kubernetes.io/hostname"
1. Apply the Deployment Manifest
Ensure your kubectl is configured and connected to the target cluster, then run:
kubectl apply -f perftest-deployment.ymlThis command will create a perftest namespace and deploy the Collector and a set of Agent Pods.
2. Verify Deployment Status
Check the status of the resources. It may take some time to pull the container images and start all the pods.
# View all resources in the perftest namespace
kubectl get all -n perftest

# Monitor the rollout progress of the agent deployment
kubectl rollout status deployment/agent -n perftest
3. Access the Collector UI
By default, the service is exposed via NodePort. You can also modify the deployment manifest to use a LoadBalancer or Ingress as needed.
Find the assigned NodePort:
kubectl get svc collector-external-service -n perftestThe output will show a port mapping similar to 8888:30088/TCP. Use the higher-range port (e.g., 30088).
Access the UI in your browser via http://<Your-Node-IP>:<NodePort>, for example: http://192.168.1.100:30088.
4. Run the Test
In the web interface, enter the number of agent replicas you defined in the deployment file (e.g., 20), then click Start Test. The Agents will automatically register, and the test will begin. The results will be displayed in real-time on the interface. After the test is finished, click Download Test Report to save the results.
5. Modify Test Configuration
If you need to change the test target (e.g., testURL, method), you can directly edit the agent-config ConfigMap:
kubectl edit configmap agent-config -n perftestThe Agent Pods will automatically detect the configuration change and reload it without needing to be restarted.