Creating gRPC Gateway Based on Protobuf
Why Use gRPC Gateway?
The core purpose of gRPC Gateway is to expose gRPC services as HTTP/JSON APIs, while also providing more flexible API management capabilities. Its main advantages include:
Strong Compatibility
Allows gRPC services to support HTTP/JSON requests, making it convenient for browsers, mobile clients, or legacy systems to call them without directly handling the gRPC protocol.High Development Efficiency
Automatically generates RESTful routes and Swagger documentation based on Protobuf definitions, reducing the need for manual, repetitive code writing.Balance of Performance and Generality
Internally uses efficient gRPC communication, while externally providing general HTTP interfaces, suitable for hybrid architecture scenarios.Simplified Transition
When gradually migrating systems, you can first expose HTTP APIs via the gateway while keeping internal communication in gRPC, reducing transformation risks.Aggregation of Multiple gRPC Service APIs
Can integrate gRPC interfaces from multiple microservices at the gateway layer, providing a unified HTTP entry point externally and reducing the complexity for clients calling multiple services directly.
gRPC Gateway acts as a bridge between gRPC microservices and RESTful clients, improving internal communication efficiency while offering flexible and unified external APIs.
Overview
The solution Create gRPC gateway server based on protobuf provides a complete solution for developing generic gRPC gateway services. This approach allows developers to focus only on implementing the business logic that calls gRPC services, while other foundational code (such as framework code, interface definitions, etc.) is automatically generated by sponge.
Applicable Scenarios:
- Services that expose RESTful APIs externally but use gRPC internally.
- Aggregating APIs from multiple microservices.
- Gradually migrating from legacy systems using REST to new services using gRPC via the gateway.
Prerequisites
Environment Requirements:
- sponge installed
- Protobuf file (e.g., user_gw.proto)
- gRPC service (e.g., user, or you can quickly create a temporary gRPC service)
Tips
To quickly get familiar with the basic syntax rules of Protobuf, please refer to the Protobuf documentation.
Creating gRPC Gateway Server
Operation Steps
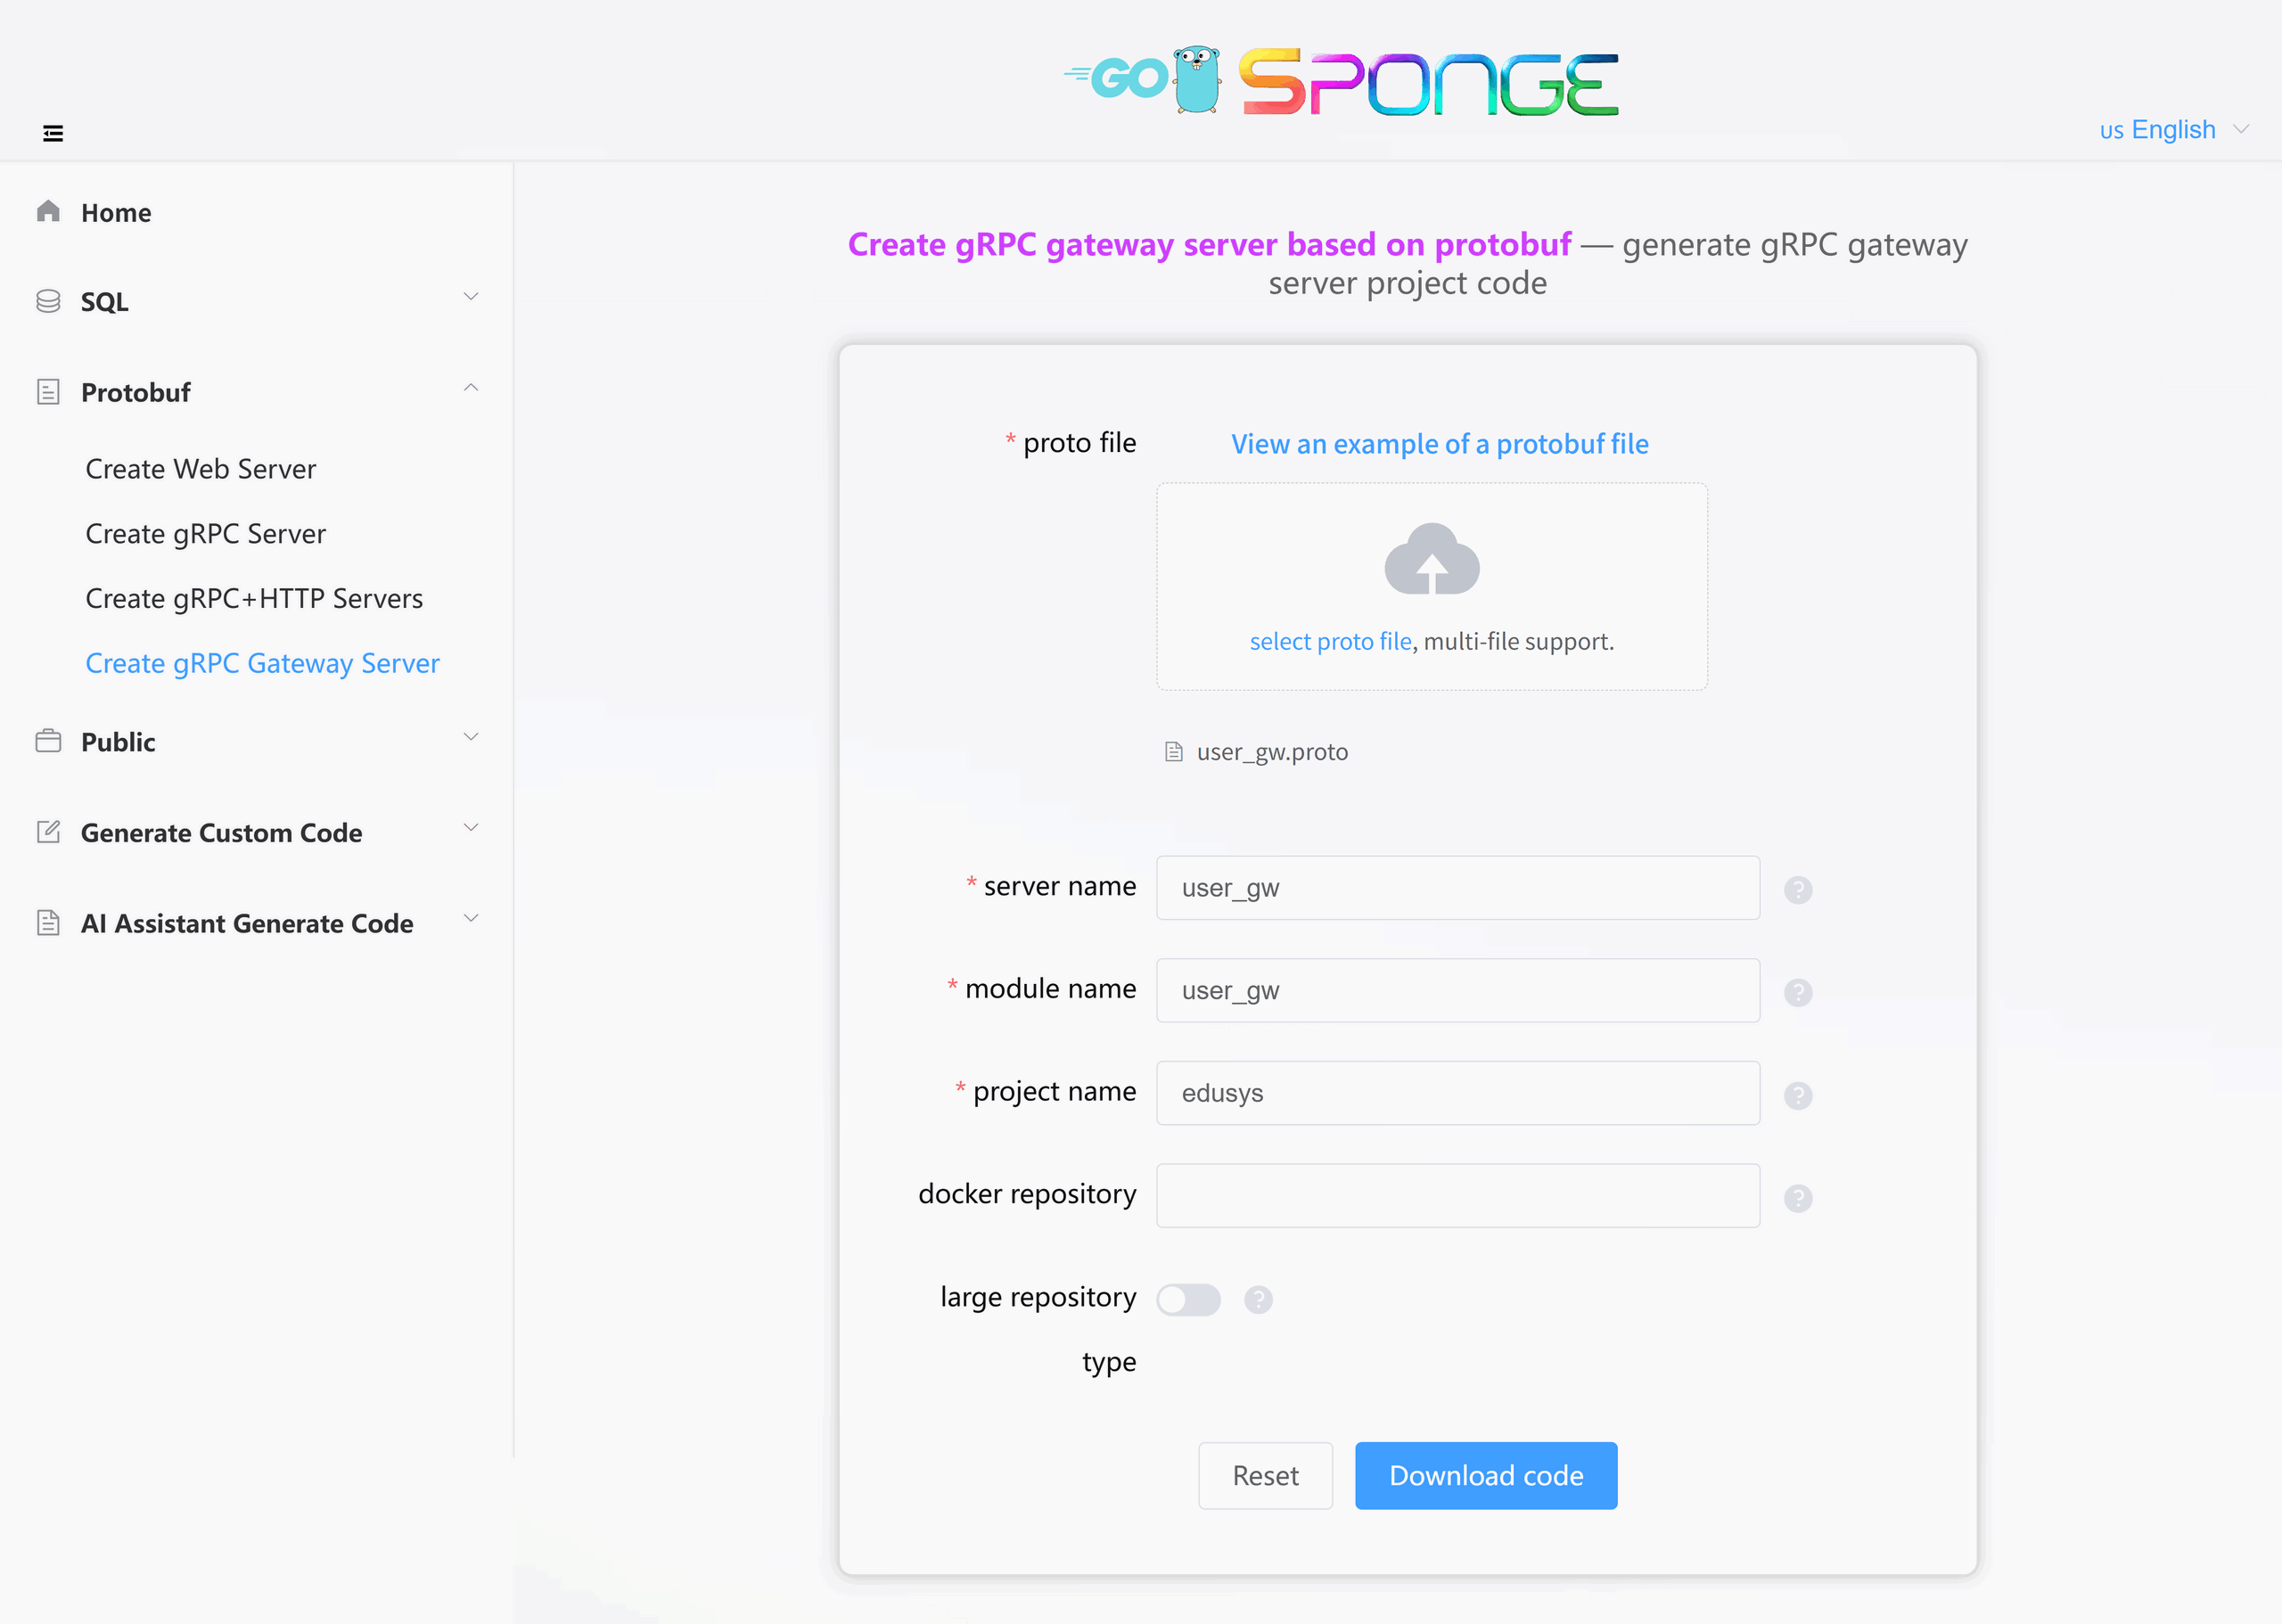
Execute the command sponge run in the terminal to enter the code generation UI:
- Click on the left menu bar [Protobuf] → [Create gRPC Gateway Server];
- Select the Protobuf file(s) (multiple selections allowed);
- Then fill in other parameters. Hover the mouse over the question mark
?to view parameter explanations.
Tips
If you enable the Mono-repo type option when filling in parameters, you must keep this setting for all subsequent related code generations.
After filling in the parameters, click the Download Code button to generate the gRPC gateway service code, as shown in the figure below:
Equivalent Command
sponge micro rpc-gw-pb --module-name=user_gw --server-name=user_gw --project-name=edusys --protobuf-file=./user_gw.protoTips
The generated gRPC gateway service code directory is named by default in the format
service name-type-time. You can modify the directory name according to your actual needs.The system automatically saves records of successfully generated code, which is convenient for generating code next time. Some parameters from the last generation will be displayed when you refresh or reopen the page.
Directory Structure
The generated code directory structure is as follows:
.
├─ api                          # API protocol definition directory (proto/OpenAPI, etc.)
│   └─ edusys                   # Service name (edusys service)
│       └─ v1                   # API version v1 (stores proto files and generated pb.go files, etc.)
├─ cmd                          # Application entry directory
│   └─ edusys                   # Service name (edusys service)
│       ├─ initial              # Initialization logic (e.g., config loading, service initialization, etc.)
│       └─ main.go              # Main program entry file
├─ configs                      # Configuration file directory (YAML format config templates)
├─ deployments                  # Deployment-related files
│   ├─ binary                   # Binary deployment scripts/configs
│   ├─ docker-compose           # Docker Compose orchestration files
│   └─ kubernetes               # Kubernetes deployment manifests
├─ docs                         # Project documentation (API docs, design docs, etc.)
├─ internal                     # Internal implementation code (not exposed externally)
│   ├─ config                   # Configuration parsing and struct definitions
│   ├─ ecode                    # Error code definitions
│   ├─ routers                  # Route definitions and middleware
│   ├─ server                   # Service startup and lifecycle management
│   └─ service                  # Business logic layer (calls gRPC services, aggregates data, etc.)
├─ scripts                      # Utility scripts (e.g., code generation, build, run, deploy, etc.)
├─ third_party                  # Third-party Protobuf dependencies/tools
├─ go.mod                       # Go module definition file (declares dependencies)
├─ go.sum                       # Go module checksum file (auto-generated)
├─ Makefile                     # Project build automation script
└─ README.md                    # Project description document
The gRPC gateway service code generated by sponge adopts a layered architecture. The complete call chain is as follows:
cmd/user/main.go → internal/server/http.go → internal/routers/router.go → internal/service
The service layer is mainly responsible for the specific implementation of API calls. If there is complex business logic, it is recommended to add an additional layer specifically for handling business logic (such as logic or biz).
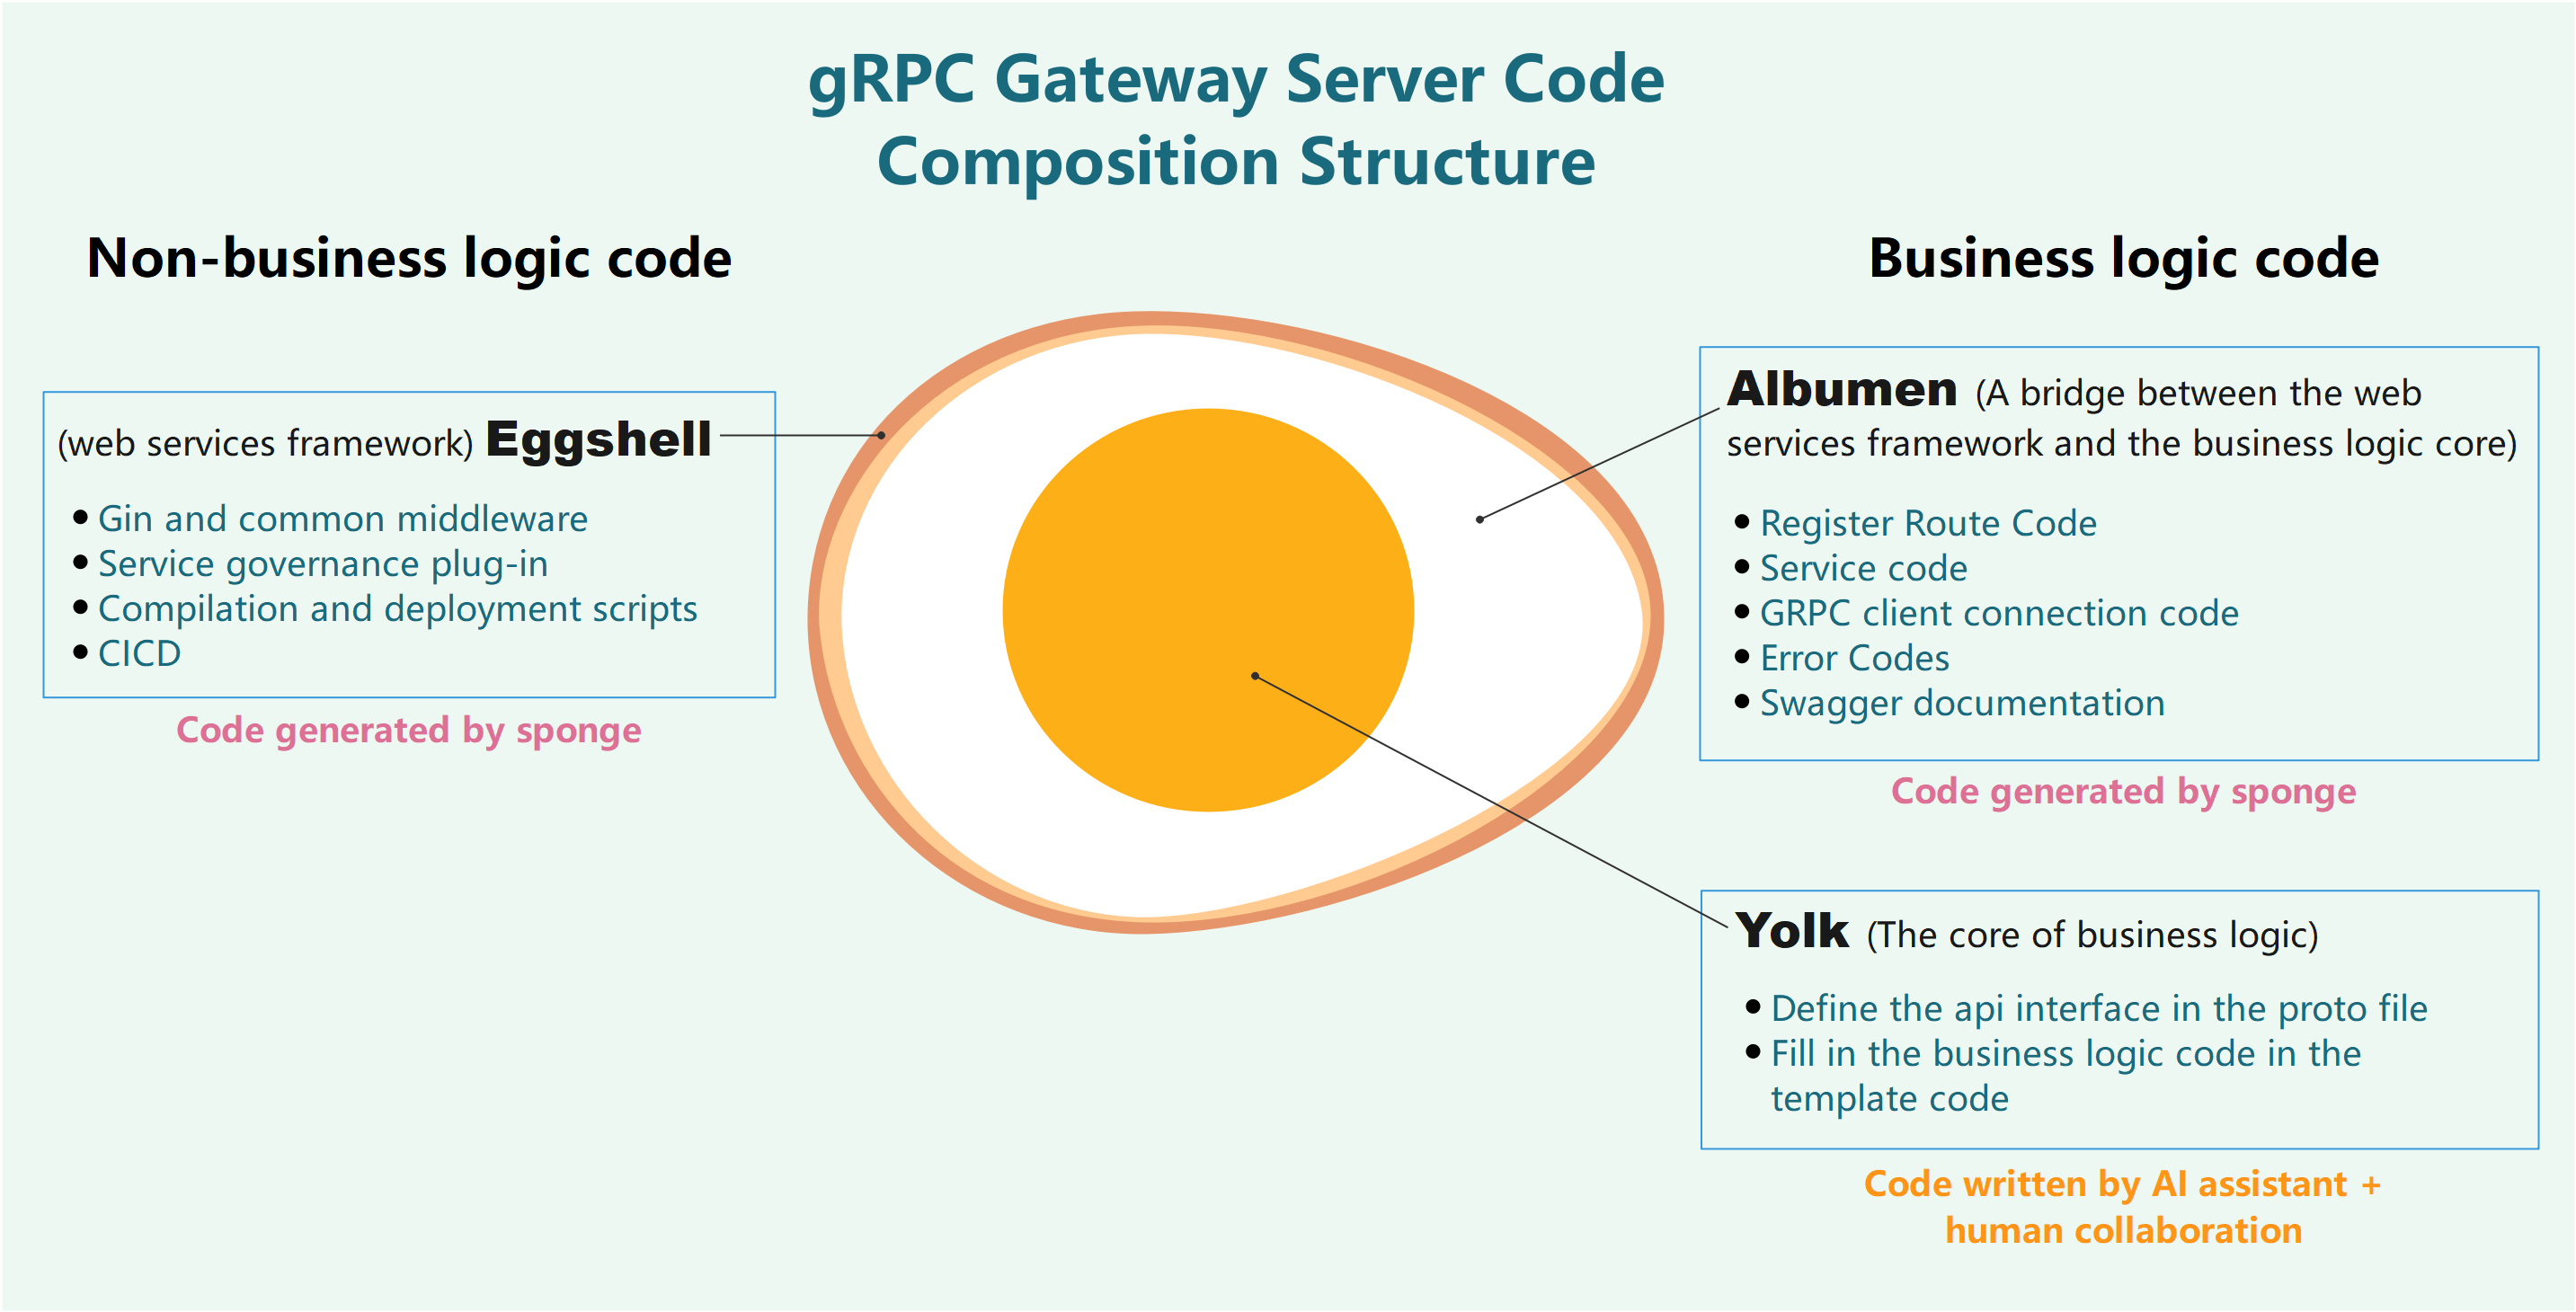
Code Structure Diagram
The created gRPC gateway service code adopts the "Egg Model" architecture:
Testing the gRPC Gateway Service Code
Unzip the code file, open the terminal, switch to the web service code directory, and execute the command:
# Generate and merge API-related code
make proto

# Compile and run the service
make run
make proto Command Details
Usage Suggestion
This command only needs to be executed when the API description in the proto file changes. Otherwise, skip this command and runmake rundirectly.This command will perform the following automated operations in the background
- Generate
*.pb.gofiles - Generate route registration code
- Generate error code definitions
- Generate Swagger documentation
- Generate API template code
- Automatically merge API template code
- Generate
Safety Mechanism
- Code merging preserves existing business logic
- Code is automatically backed up before each merge to:
- Linux/Mac:
/tmp/sponge_merge_backup_code - Windows:
C:\Users\[username]\AppData\Local\Temp\sponge_merge_backup_code
- Linux/Mac:
Open the Swagger page in your browser at http://localhost:8080/apis/swagger/index.html. You can view the API documentation on this page.
Attention
Before implementing business logic, Swagger requests will return a 500 error. This is because the generated template code (internal/handler/xxx.go) includes panic("implement me") in each method, prompting developers to implement the specific business logic themselves or with the help of the built-in AI assistant.
Swagger Configuration Explanation
If you modify the HTTP port (e.g., from 8080 to 9090) in the configs/service name.yml configuration file, you must also complete the following operations:
- Modify the
@hostvalue in the code filecmd/service name/main.goto the new port (e.g., localhost:9090). - Re-execute
make docsto generate the documentation.
Otherwise, API requests will fail due to inconsistent ports.
Cross-Service gRPC API Calls
In a microservice architecture, the current service might need to call APIs provided by other gRPC services. These target services may be implemented in different languages but must all use the Protocol Buffers protocol. The following describes the complete call process:
Generating gRPC Service Connection Code
Operation Steps:
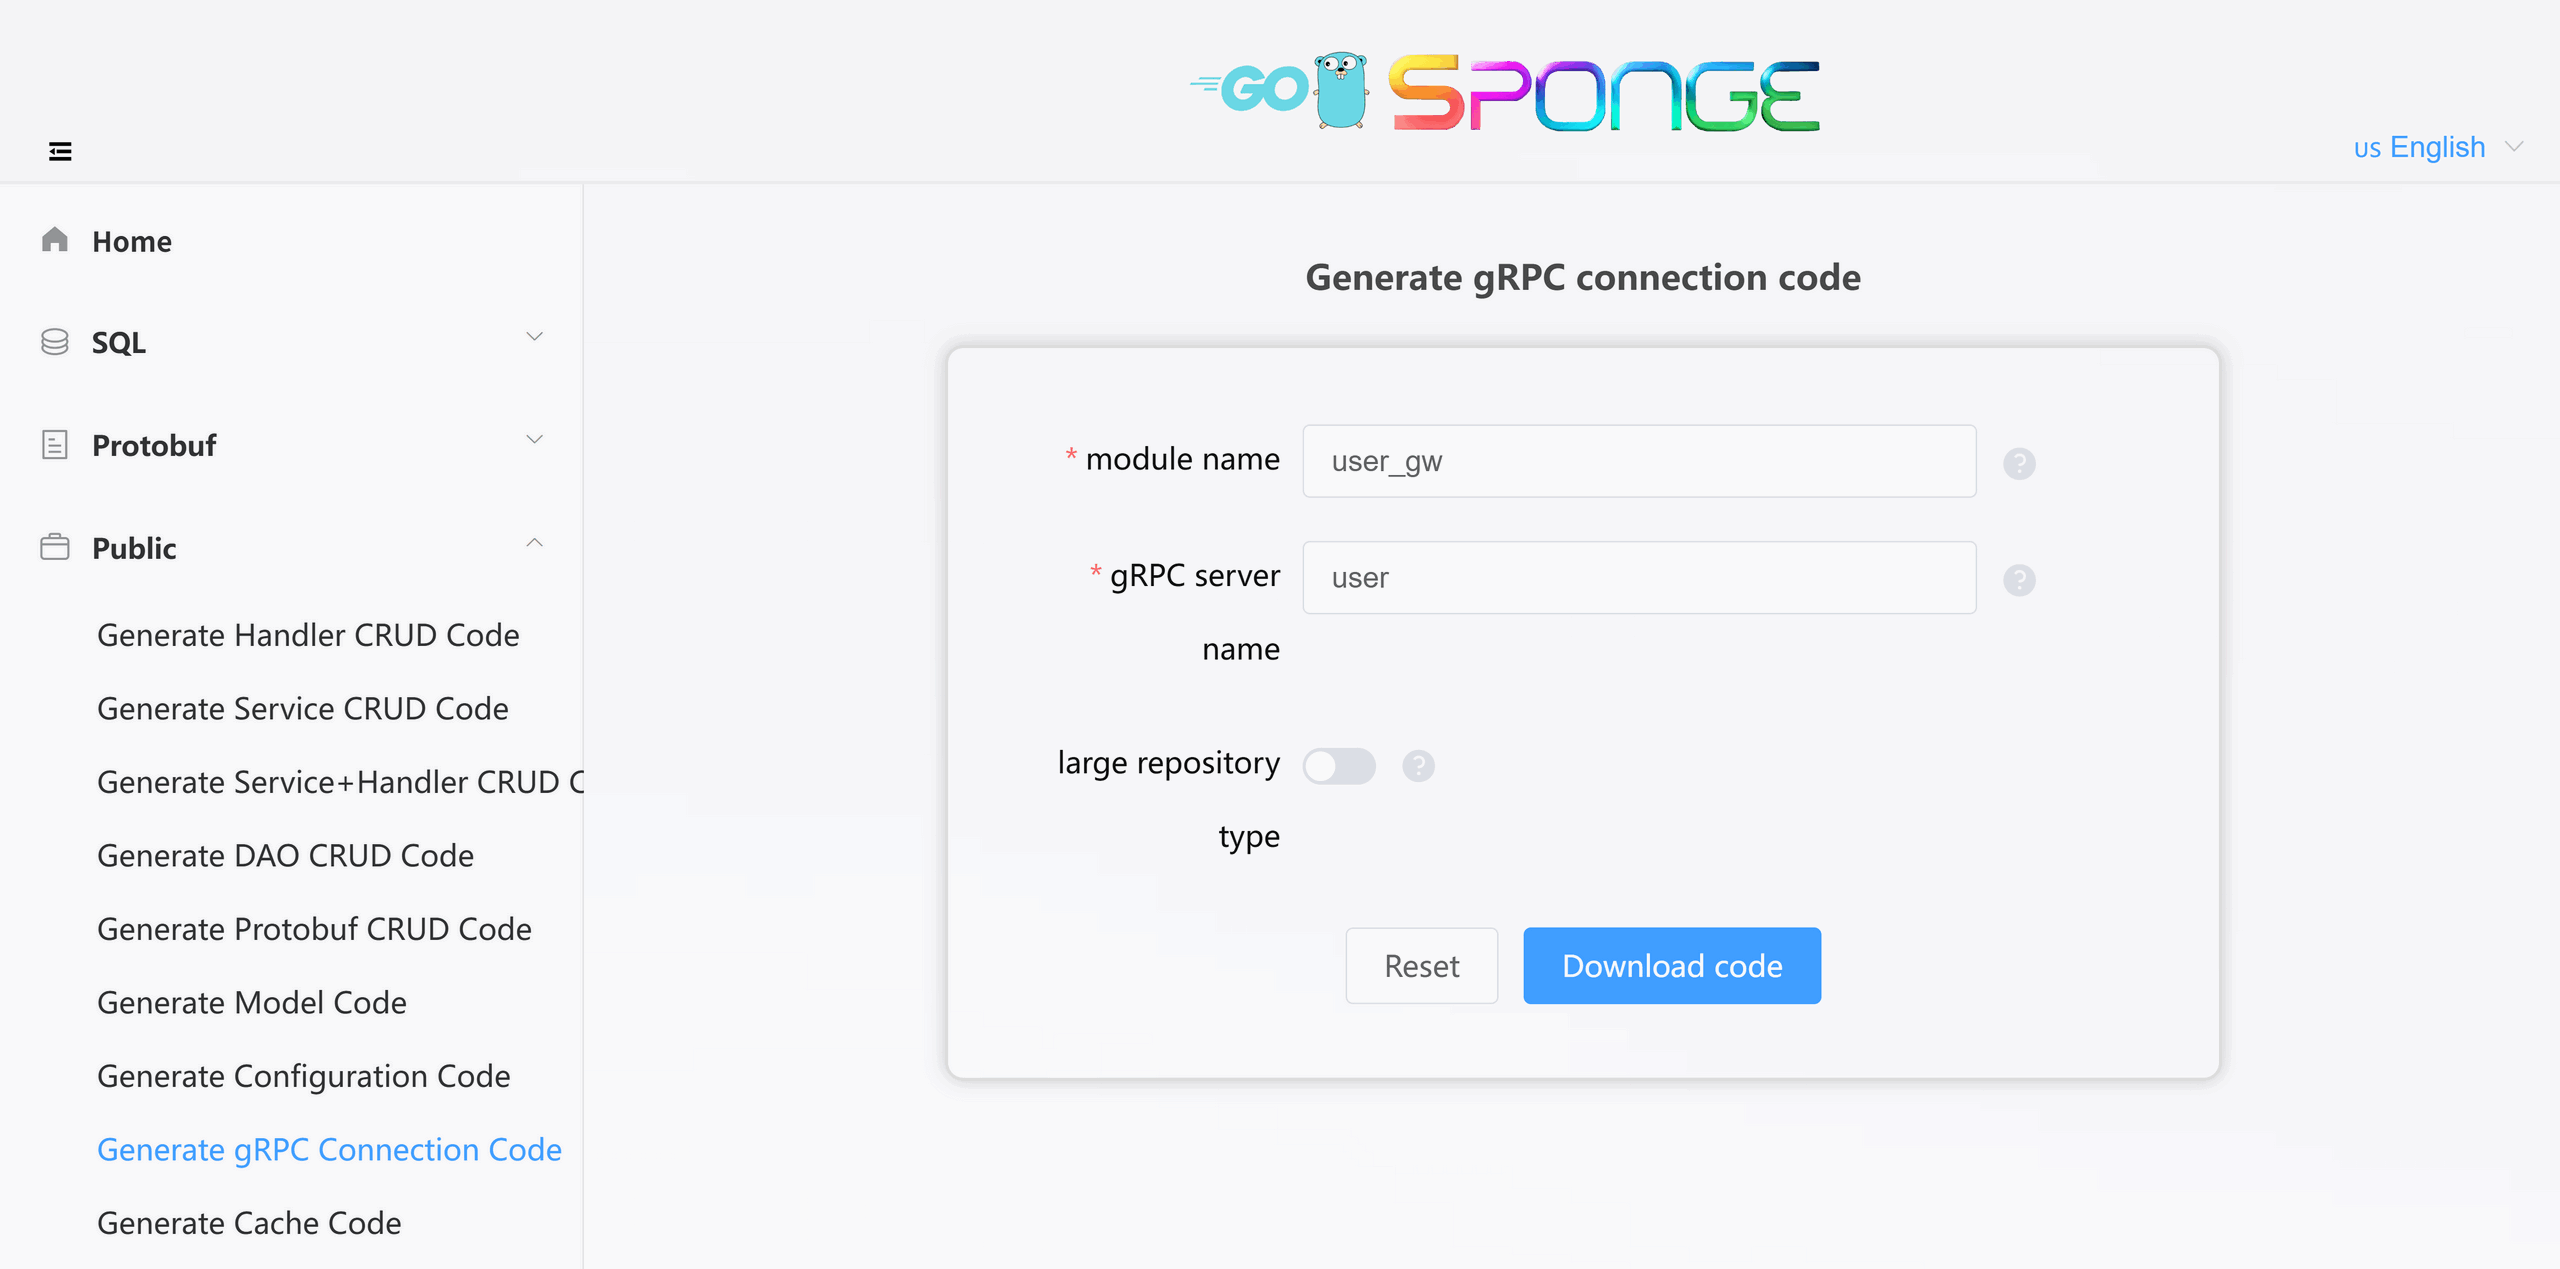
- Access the sponge UI.
- Navigate to [Public] → [Generate gRPC Connection Code].
- Fill in parameters:
- Module Name (required)
- gRPC Service Name(s) (supports multiple services, separated by commas)
Click the Download Code button to generate the gRPC service connection code, as shown in the figure below:
Equivalent Command
# Full command
sponge micro rpc-conn --module-name=user_gw --rpc-server-name=user

# Simplified command (use --out to specify the service code directory, code is automatically merged into the specified service directory)
sponge micro rpc-conn --rpc-server-name=user --out=user_gw
Generated Code Structure:
.
└─ internal
    └─ rpcclient  # Contains full client configuration including service discovery, load balancing, etc.
Unzip the code and move the internal directory into the current service's code directory.
Example of using the generated gRPC connection code in your code:
In actual use, you might need to call APIs from multiple gRPC services to obtain data. The initialization example code is as follows:
package service

import (
    userV1 "edusys/api/user/v1"
    relationV1 "edusys/api/relation/v1"
    creationV1 "edusys/api/creation/v1"
    // ......
)

type userClient struct {
    relationCli relationV1.RelationClient
    creationCli creationV1.CreationClient
}

// NewUserClient create a client
func NewUserClient() edusysV1.UserLogicer {
    return &userClient{
        // Instantiate multiple gRPC service client interfaces
        relationCli: userV1.NewRelationClient(rpcclient.GetRelationRPCConn()),
        creationCli: userV1.NewCreationClient(rpcclient.GetCreationRPCConn()),
    }
}

// ......
Configuring Target gRPC Service Connection Parameters
Add the following configuration to the configs/service name.yml configuration file:
grpcClient:
  - name: "user"        # grpc service name
    host: "127.0.0.1"   # grpc service address, if service discovery is enabled, this field value is invalid
    port: 8282          # grpc service port, if service discovery is enabled, this field value is invalid
    registryDiscoveryType: ""  # service discovery, default disabled, supports consul, etcd, nacos
Multi-service configuration example:
grpcClient:
  - name: "user"
    host: "127.0.0.1"
    port: 18282
    registryDiscoveryType: ""
  - name: "relation"
    host: "127.0.0.1"
    port: 28282
    registryDiscoveryType: ""
  - name: "creation"
    host: "127.0.0.1"
    port: 38282
    registryDiscoveryType: ""
Tips
For complete configuration options, please refer to the grpcClient field description in the configs/[service name].yml configuration file.
Calling Target gRPC Service API
After successfully connecting to the target gRPC service, to clarify which API interfaces are callable, you need to import the Go language stub code generated from the proto files. Depending on the service architecture, API calling methods fall into two main categories:
Single-repo (Mono-repo) Architecture
If the target gRPC service was created by sponge and belongs to the same microservice mono-repo as the current service (chosen "Mono-repo" type during service creation), you can directly call its APIs, and there are no cross-service dependency issues.Multi-repo Architecture
If the target gRPC service is located in an independent code repository, you need to address the issue of cross-service referencing of proto files and Go stub code. Here are two common solutions:Solution One: Using a Public Protobuf Repository
For microservice systems with a multi-repo architecture, it is recommended to create a dedicated public Git repository (e.g.,
public_protobuf) to centrally manage proto files and their generated Go stub code. The typical directory structure is as follows:· ├── api │ ├── serverName1 │ │ └── v1 │ │ ├── serverName1.pb.go │ │ └── serverName1_grpc.pb.go │ └── serverName2 │ └── v1 │ ├── serverName2.pb.go │ └── serverName2_grpc.pb.go ├── protobuf │ ├── serverName1 │ │ └── serverName1.proto │ └── serverName2 │ └── serverName2.proto ├── go.mod └── go.sumCall Steps:
Copy the
protobufdirectory from the public repository to thethird_partydirectory of your local service.. ├── third_party │ └── protobuf │ ├── serviceA │ │ └── serviceA.proto │ └── serviceB │ └── serviceB.protoImport the target proto file in your local proto file using
import(e.g.,import "protobuf/serviceA/serviceA.proto";).Call the target gRPC service's API in the service layer of your local service.
Note
Ensure that the proto files under
third_party/protobufare synchronized with the public repository.Solution Two: Copying the target service's proto file(s) to the current service and generating Go stub code
Adopt different processing flows based on how the target service was created:
Service not created by sponge
- Manually copy the target service's proto file(s) to the
api/target service name/v1directory. - Manually modify the
go_packagepath definition in the proto file(s).
- Manually copy the target service's proto file(s) to the
Service created by sponge
Integrate by using automated commands:
# Copy the target service's proto file(s) (supports multiple service directories, separated by commas)
make copy-proto SERVER=../target_service_dir

# Generate Go stub code
make proto
Advanced Options:
- Specify proto files:
PROTO_FILE=file1,file2 - Automatic backup: Overwritten files can be recovered from
/tmp/sponge_copy_backup_proto_files.
- Specify proto files:
Testing Cross-Service gRPC API Calls
Start dependency services:
- gRPC service created by sponge: For example, user, execute
make run. - Other gRPC services: Run according to their actual startup commands.
- gRPC service created by sponge: For example, user, execute
Start the current service, execute the command:
# Generate and merge API-related code
make proto

# Compile and run the service
make run
Open the Swagger page in your browser at http://localhost:8080/apis/swagger/index.html and test the API on the page.
Developing Custom APIs
In a gRPC gateway service, in addition to cross-service API calls, you might need to add new custom APIs. sponge adopts a "define-to-generate" development model, which can quickly realize custom API development. This mainly involves the following three steps:
Define API
Declare the request/response format of the API in the.protofile.Implement Logic
Fill in the core business logic code in the automatically generated code template.Test and Verify
Test the API in the built-in Swagger, without needing to rely on third-party tools like Postman.
The following takes adding a "Change Password" API as an example to detail the development process.
1. Defining the API
Navigate to the project directory api/edusys/v1 and open the file user_gw.proto. Add the description information for the Change Password API:
import "validate/validate.proto";
import "tagger/tagger.proto";

service user {
  // ...

  // Change password, describe specific implementation logic here, tell sponge's built-in AI assistant to generate the business logic code
  rpc ChangePassword(ChangePasswordRequest) returns (ChangeRegisterReply)  {
    option (google.api.http) = {
      post: "/api/v1/user/change_password"
      body: "*"
    };
    option (grpc.gateway.protoc_gen_openapiv2.options.openapiv2_operation) = {
      summary: "Change Password",
      description: "Change password",
      security: {
        security_requirement: {
          key: "BearerAuth";
          value: {}
        }
      }
    };
  }
}

message ChangePasswordRequest {
  uint64 id = 1 [(validate.rules).uint64.gte  = 1, (tagger.tags) = "uri:\"id\"" ];
  string password = 2 [(validate.rules).string.min_len = 6];
}

message ChangePasswordReply {
}
After adding the API description information, execute the command in the terminal:
# Generate and merge API-related code
make proto
2. Implementing Business Logic
There are two ways to implement business logic code:
Manually writing business logic code
Open the code file
internal/handler/user.goand write the business logic code under the ChangePassword method function, referring to the template code.Note
When developing custom APIs, you might need to perform database CRUD operations or cache operations. You can reuse the following code:
Automatically generating business logic code
Sponge provides a built-in AI assistant to generate business logic code. Click to view the AI Assistant Generated Code section.
The business logic code generated by the AI assistant may not fully meet actual requirements and needs to be modified according to the specific situation.
3. Testing Custom APIs
After implementing the business logic code, execute the command in the terminal:
# Compile and run the service
make run
Refresh the Swagger page in your browser at http://localhost:8080/apis/swagger/index.html and test the custom API on the page.
Service Configuration Explanation
The "Creating Web Service Based on Protobuf" solution provides rich configurable components. You can flexibly manage these components by modifying the configs/service name.yml configuration file.
Component Management Explanation
Custom gin middleware:
- Can add or replace middleware in
internal/routers/routers.go. - If API authentication is required, add
middleware.Auth()ininternal/routers/table name.go.
Default Enabled Components
| Component | Description | Configuration Doc |
|---|---|---|
| logger | Logging component • Default terminal output • Supports console/json format • Supports log file splitting and retention | Log Configuration |
| enableMetrics | Prometheus metrics collection • Default route /metrics | Monitoring Configuration |
| enableStat | Resource monitoring • Records CPU/memory usage per minute • Automatically saves profile if threshold is exceeded | Resource Statistics |
Default Disabled Components
| Component | Description | Configuration Doc |
|---|---|---|
| cacheType | Cache support (Redis/memory) | Redis Configuration |
| enableHTTPProfile | Performance analysis (pprof) • Default route /debug/pprof/ | - |
| enableLimit | Adaptive request rate limiting | Rate Limit Configuration |
| enableCircuitBreaker | Service circuit breaker protection | Circuit Breaker Configuration |
| enableTrace | Distributed tracing | Tracing Configuration |
| registryDiscoveryType | Service registration and discovery • Consul/Etcd/Nacos | Service Registration and Discovery Configuration |
| grpcClient | gRPC client connection settings • Service name, address, port • Service discovery type • Timeout settings, load balancing • Certificate verification, token verification | gRPC Client Configuration |
Configuration Update Process
If you add or change field names in the configuration file configs/service name.yml, you need to update the corresponding Go code (internal/config/xxx.go). Execute the command in the terminal:
# Regenerate configuration code
make update-config
Note
If you only modify the values of fields in the configuration file, you do not need to execute the make update-config command, just recompile and run.
Tips
For more detailed information on components and configuration, click to view the Components and Configuration section.