Creating gRPC+HTTP Servers Based on Protobuf
Why choose HTTP + gRPC Service?
Click to view Why choose HTTP + gRPC mixed service?
Overview
Create gRPC+HTTP servers based on protobuf provides a complete solution for developing general gRPC+HTTP mixed services. This solution allows developers to focus only on implementing business logic, while other basic code (such as framework code, interface definitions, etc.) is automatically generated by sponge. It's worth noting that business logic code can also be generated using sponge's built-in AI assistant, further reducing manual coding effort.
Tips
Another gRPC+HTTP service development solution, Create gRPC+HTTP servers based on sql (see Based on SQL), only uses built-in ORM components, while this solution supports using built-in ORM components or custom ORM components. This is the difference between the two solutions for creating gRPC+HTTP mixed services; everything else is the same.
Applicable Scenarios: Suitable for general backend service projects that support both gRPC and HTTP protocols simultaneously.
Create gRPC+HTTP servers based on protobuf defaults to no ORM component. It supports development using built-in ORM components or custom ORM components. The following will take the built-in ORM component gorm as an example to detail the development steps for gRPC+HTTP service.
Tips
Built-in ORM Components: gorm, mongo, supporting database types mysql, mongodb, postgresql, sqlite.
Custom ORM Components: For example, sqlx, xorm, ent, etc. When selecting a custom ORM component, developers need to implement the relevant code themselves. Click to view the chapter: Instructions for using custom ORM components.
Prerequisites
Environment Requirements:
- sponge is installed
- mysql database service
- Database table structure
- Proto file, e.g., user.proto.
Tips
Generating service+handler CRUD code requires a mysql service and database tables. You can start a mysql service via the docker script and then import the example SQL.
To quickly get familiar with the basic syntax rules of Protobuf, please refer to the Protobuf documentation.
Creating gRPC+HTTP Server
Operation Steps
Execute the command sponge run in the terminal to enter the code generation UI:
- Click on the left menu bar [Protobuf] → [Create gRPC+HTTP Servers];
- Select the proto file(s) (multiple selections allowed);
- Then fill in other parameters. Hover the mouse over the question mark
?to see the parameter description.
Tips
If the Monorepo type option is enabled when filling parameters, this setting must be maintained for all subsequent code generation.
After filling in the parameters, click the Download Code button to generate the gRPC+HTTP service project code, as shown in the figure below:

Equivalent Command
sponge micro grpc-http-pb --module-name=user --server-name=user --project-name=edusys --protobuf-file=./user.protoTips
The directory name of the generated gRPC+HTTP mixed service code is default named in the format
service name-type-time. You can modify the directory name as needed.The system automatically saves the records of successfully generated code for convenient use in subsequent code generation. When refreshing or reopening the page, some previous parameters will be displayed.
Directory Structure
The directory structure of the generated code is as follows:
.
├─ api                          # API protocol definition directory (proto/OpenAPI, etc.)
│   └─ user                     # Service name (user service)
│       └─ v1                   # API version v1 (stores proto files and generated pb.go files, etc.)
├─ cmd                          # Application entry directory
│   └─ user                     # Service name (user service)
│       ├─ initial              # Initialization logic (e.g., config loading, service initialization, etc.)
│       └─ main.go              # Main program entry file
├─ configs                      # Configuration file directory (YAML format config templates)
├─ deployments                  # Deployment-related files
│   ├─ binary                   # Binary deployment scripts/configs
│   ├─ docker-compose           # Docker Compose orchestration files
│   └─ kubernetes               # Kubernetes deployment manifests
├─ docs                         # Project documentation (API docs, design docs, etc.)
├─ internal                     # Internal implementation code (not exposed externally)
│   ├─ config                   # Configuration parsing and struct definitions
│   ├─ ecode                    # Error code definitions
│   ├─ handler                  # Business logic processing layer (similar to Controller)
│   ├─ routers                  # Route definitions and middleware
│   ├─ server                   # Service startup and lifecycle management
│   └─ service                  # Business logic layer
├─ scripts                      # Utility scripts (e.g., code generation, build, run, deployment, etc.)
├─ third_party                  # Third-party Protobuf dependencies/tools
├─ go.mod                       # Go module definition file (declares dependencies)
├─ go.sum                       # Go module checksum file (auto-generated)
├─ Makefile                     # Project build automation script
└─ README.md                    # Project description document
Code Call Chain Explanation:
gRPC main call chain:
cmd/user/main.go→internal/server/grpc.go→internal/service→internal/dao→internal/modelHTTP main call chain:
cmd/user/main.go→internal/server/http.go→internal/routers/router.go→internal/handler→internal/service→internal/dao→internal/model
From the call chain, you can see that the HTTP call chain shares the business logic layer service with the gRPC call chain, eliminating the need to write two sets of code and protocol conversion.
The service layer is primarily responsible for API processing. If more complex business logic needs to be handled, it is recommended to add an additional business logic layer (such as logic or biz) between service and dao. For details, please click to view the chapter: Code Layered Architecture.
Code Structure Diagram
The created gRPC service code adopts the "Egg Model" architecture:

Testing gRPC+HTTP Service API
Decompress the code file, open a terminal, switch to the gRPC+HTTP service code directory, and execute the command:
# Generate and merge API related code
make proto

# Open the generated code file (e.g., internal/service/user.go)
# Fill in business logic code, supports manual writing or generation using the built-in AI assistant

# Compile and run the service
make run
make proto command detailed explanation
Usage Advice
Execute this command only when API descriptions in the proto file change. Otherwise, skip this command and runmake rundirectly.This command performs the following automated operations in the background
- Generate
*.pb.gofiles - Generate router registration code
- Generate error code definitions
- Generate Swagger documentation
- Generate gRPC client test code
- Generate API template code
- Automatically merge API template code
- Generate
Safety Mechanism
- Existing business logic is preserved during code merging
- Code is automatically backed up before each merge to:
- Linux/Mac:
/tmp/sponge_merge_backup_code - Windows:
C:\Users\[Username]\AppData\Local\Temp\sponge_merge_backup_code
- Linux/Mac:
Testing gRPC API
Method 1: Using an IDE
Open Project
- Load the project using an IDE like
GolandorVSCode.
- Load the project using an IDE like
Execute Tests
- Navigate to the
internal/servicedirectory and open the file with the_client_test.gosuffix. - The file contains test and benchmark functions for each API defined in the proto.
- Modify the request parameters (similar to testing on the Swagger interface).
- Run the tests through the IDE, as shown in the figure below:
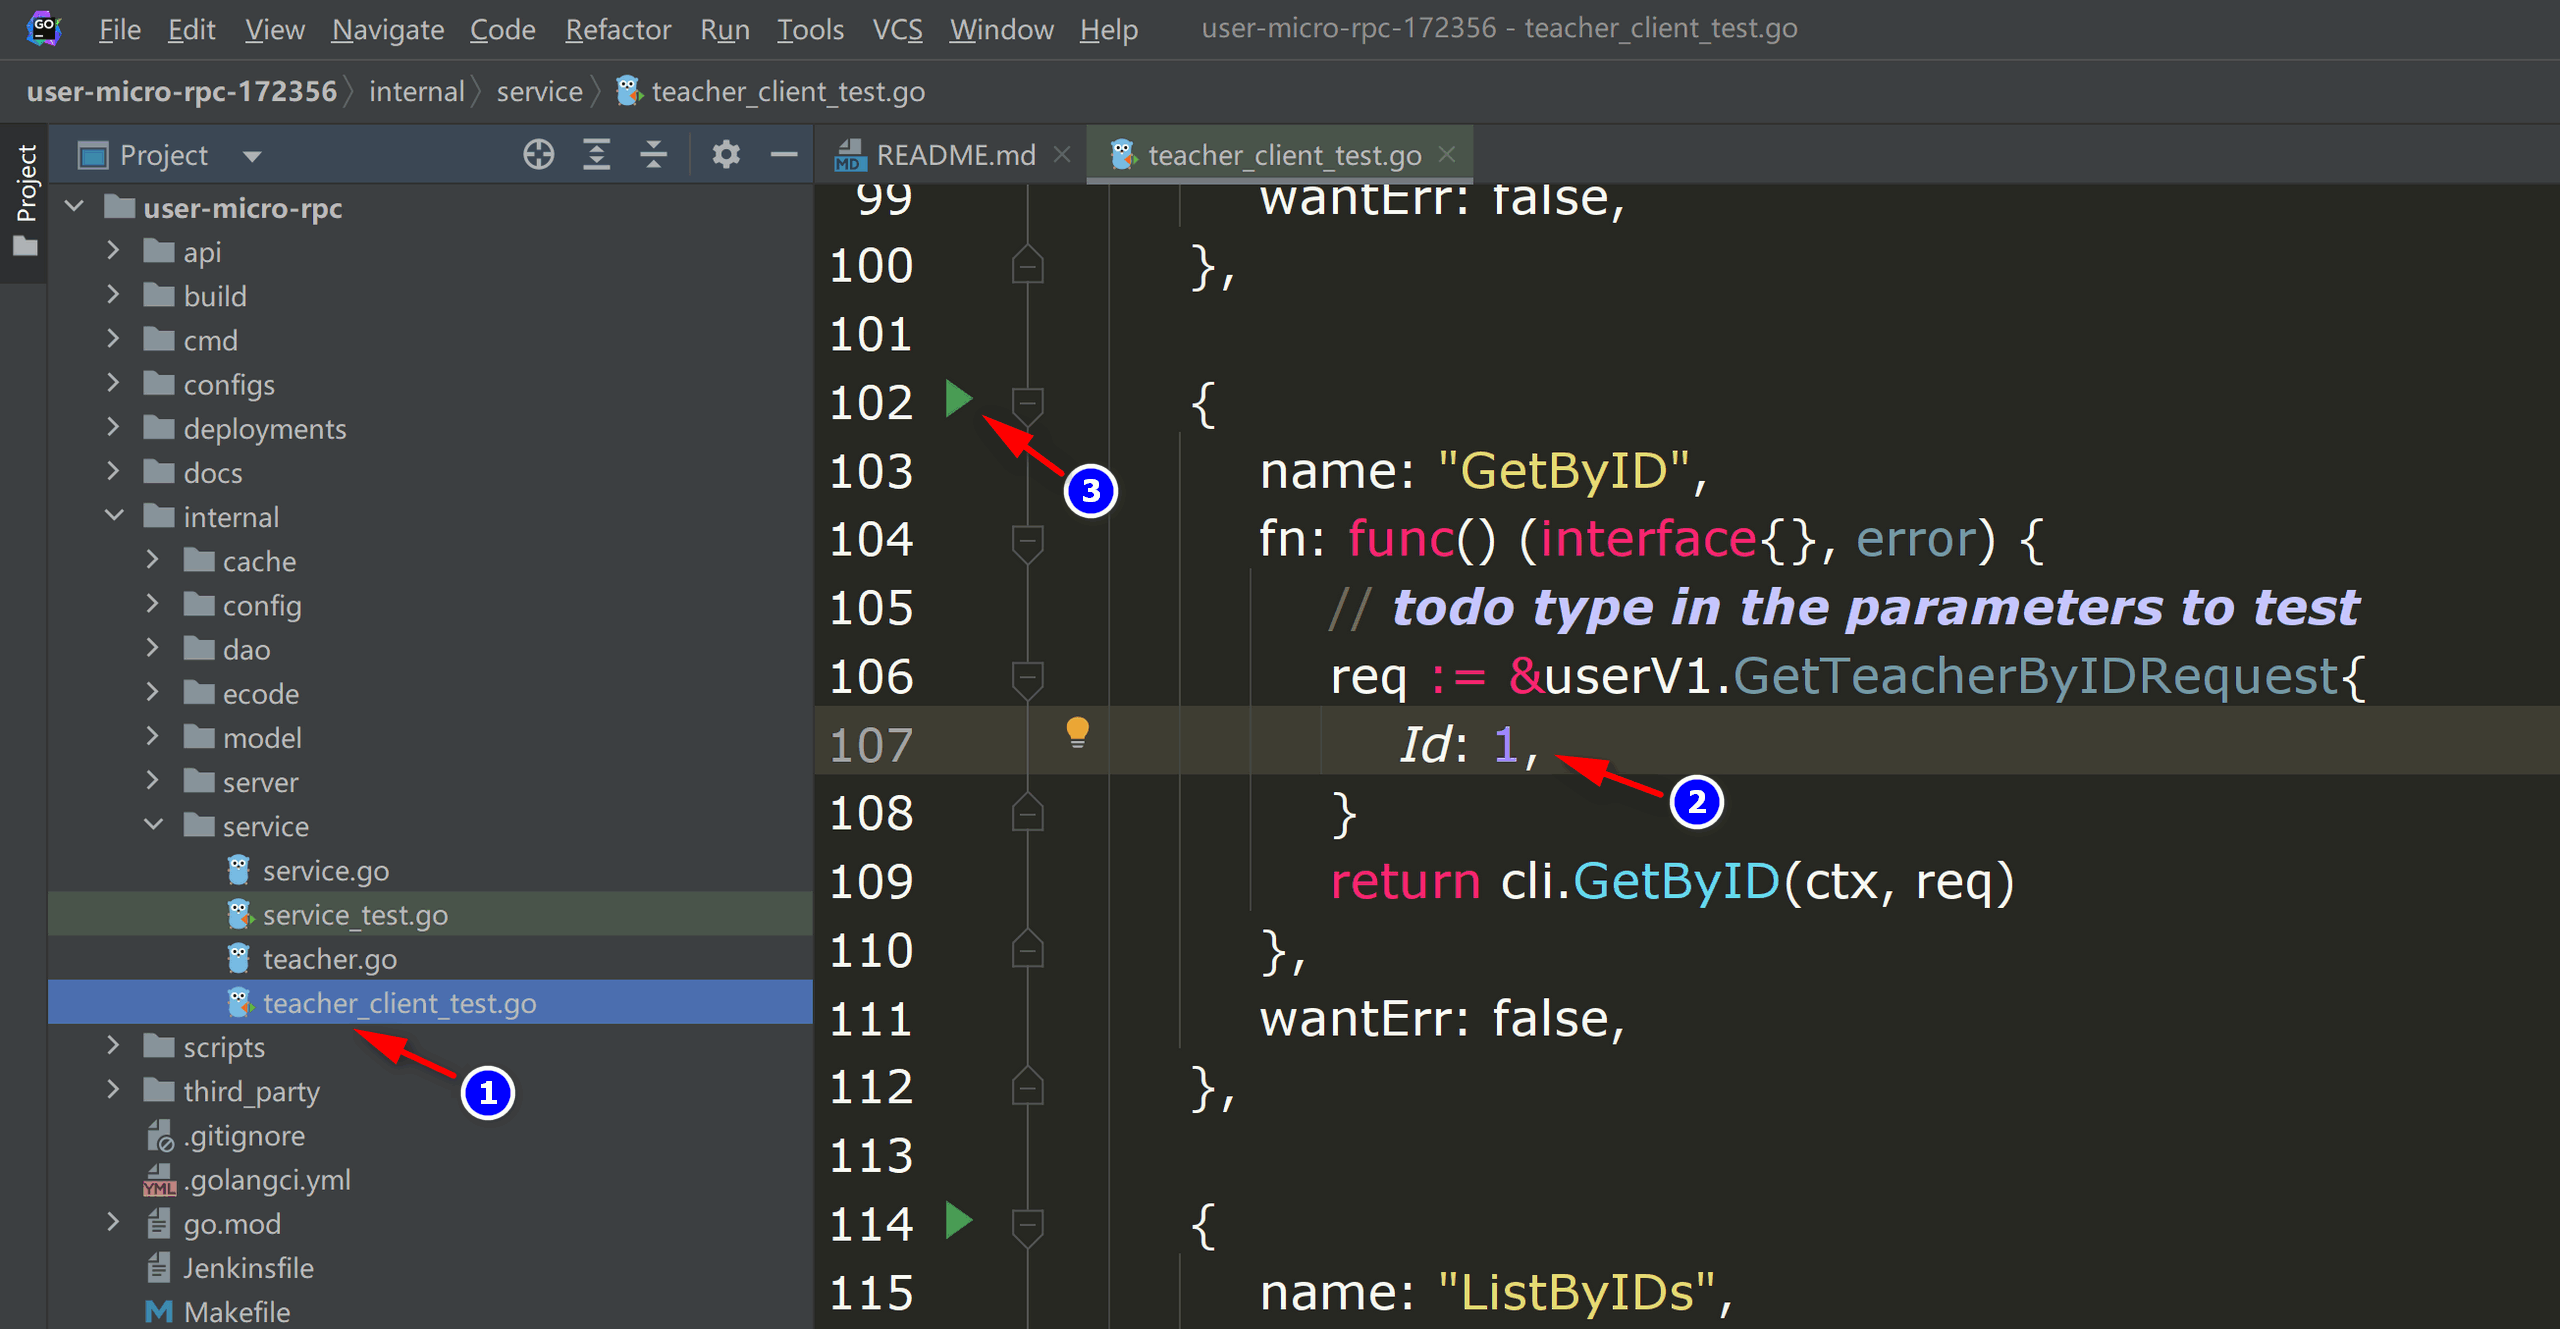
micro-rpc-test - Navigate to the
Method 2: Using Command Line
Navigate to Directory
cd internal/serviceModify Parameters
- Open the
xxx_client_test.gofile. - Fill in the request parameters for the gRPC API.
- Open the
Execute Test
go test -run "TestFunctionName/gRPCMethodName"Example:
go test -run "Test_service_teacher_methods/GetByID"
Testing HTTP API
Visit http://localhost:8080/apis/swagger/index.html in your browser to test HTTP APIs.
Add CRUD API
Click to view the chapter: Add CRUD API.
Develop Custom API
Click to view the chapter: Develop Custom API.
Cross-Service gRPC API Call
Click to view the chapter: Cross-Service gRPC API Call.
Service Configuration Explanation
Click to view the chapter: Service Configuration Explanation.